
Alexander Grabovetskiy, woodcarver, School of Woodcarving · Published 2018
How do you keep a wood carving clean while you carve it?
Quick answer: Keeping a wood carving clean is mostly about your hands. However often you wash, they still carry body oils, and the wood turns dirty where you touch it. On my pierced Hashemi panel, with areas I can't even reach later, I wore powder free medical rubber gloves while I carved.
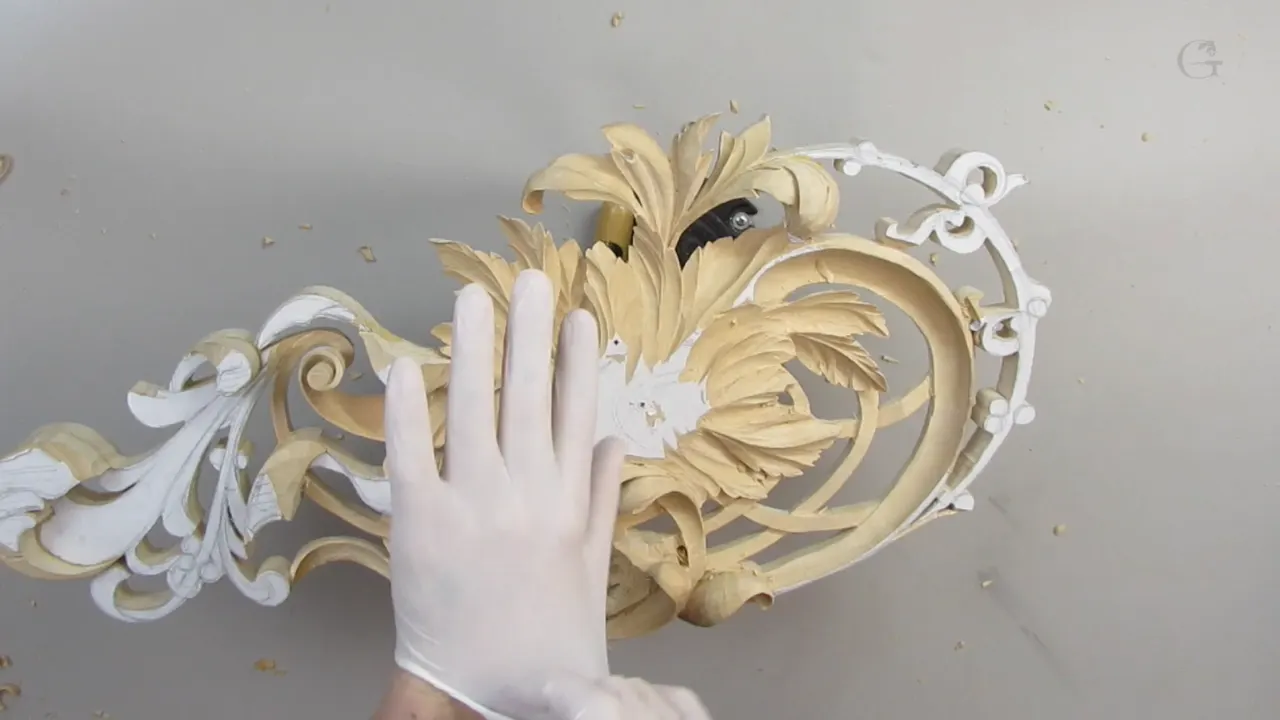
Keeping a carving clean means keeping body oil off the wood. Here on camera I say it plainly: it doesn't matter how clean your hands are, you still have body oils. So on this pierced panel I take rubber gloves, powder free, like the medical ones. They won't protect my hands, I know. But I can touch freely, and that keeps my piece really, really clean.
Do you hold the panel with one hand while the other one carves? And when you need a better look, does that hand turn it and lean on it? Then your skin is on that wood all day long. So in workshop 13 of Carving Hashemi Flowers I stop for a minute to show what I do about it, because some areas of this panel will be out of reach later.
I'll show you the gloves I wore here, the other pairs I showed two workshops later, where I buy them, and the finger that keeps my steel away from finished edges.

Four things that leave marks on a carving
- Body oil, even from hands you wash all the time.
- A tool hitting a finished edge.
- A gouge pried against the panel instead of against your finger.
- Too many pencil lines.
Why does wood get dirty from clean hands?
Washing doesn't take the oils out of your hands. I know it sounds really bad, but every one of us has body fat on the hands, and once you touch the wood, it becomes really, really dirty. I don't like that look.
In the Roman Acanthus class I went a step further. Wash all the time, I said there, and you will still see the same black marks. The oils stay inside the hands. When you touch wood, oxidation happens, like a natural patina, and that's why at the later stage it's a good idea to use some kind of gloves.
A question and answer session got a different answer. Body oil is not the biggest problem, I said there; a reaction happens inside the wood when you're touching it, and it becomes darker. Two classes, two ways to say it.

What gloves did I wear on this pierced panel?
Rubber gloves, powder free, the medical kind, and any rubber gloves will work, I said on camera, but powder free is what I use. Right after that little talk I went back in, all the way down, for a really deep excavation with a #9 gouge at 10 millimeters (3/8 in).

The gloves stayed on for heavier work too. Later one wall of the design turned into waste. I picked up a big number seven, one inch (25 mm), and warned myself not to touch this leaf. The frame below shows the glove still on my hand while that Ashley Iles gouge works.

Which gloves give you a better grip?
The ones with rubber applied on them. Two workshops later, in workshop 15, I came back to this with other options. Cheap white cotton gloves work too. I buy them on Amazon, in bulk, and you can even wash them if you wish, and they won't protect your hands, but they protect your wood from body stains.
Grip is the trouble with the white ones. There isn't too much grip in my hands with them, and for details that's still no problem at all. But to take off a lot of material you want some kind of grip, and that is what the rubber-coated ones give you. Any Home Depot or Lowe's has them if you are in the United States. They're really bright, I know. You can have a lot of control with them, though, and they won't save your hands either.

Here is what I said about each kind, and where I said it.
| Glove | Where and when I said it on camera | My words |
|---|---|---|
| Powder free medical rubber | This course, workshop 13, on the pierced panel you see here | I can touch freely, really clean |
| White cotton, bought in bulk | Hashemi workshop 15, and only when the work is fragile | Not much grip, no problem with details |
| Gloves with rubber applied | Workshop 15 as well, for taking off a lot of material | Better grip, a lot of control |
| Thin white painter's gloves | Answering a student in lesson 6 of the Tray of Blessing class | With any gloves, I just don't feel the tool |
| Latex gloves | The Modern Acanthus class, lesson 7 | Work well, but all day they feel really bad |
What does a glove take away from you?
Feel, mostly. I'm going to be honest with you about this, because gloves are not my everyday habit. In lesson 6 of the Tray of Blessing class a student asked about the oils in our hands, and I said I used to carve in thin white painter's gloves, the material ones. But with any gloves, I just don't feel the tool.
Rubber ones feel much better, I told that class, yet there is still something like a block, with no connection between my hand and the tool. Bare, it feels like a continuation of my hand. The Modern Acanthus class heard the same about latex. It works well, I said, but all day long in latex feels really bad, and with bare hands I feel my tool much better.
So on most pieces I carve bare. The same came up in workshop 15: I'm not always using gloves, just when I'm working on fragile pieces like this one. Sometimes, on a piece with no stain or paint planned, a cloth or a paper towel goes over the finished section instead. This panel got the gloves anyway.

What makes a pierced panel different?
Parts of it close up for good, and I said so on camera. I don't like that dirty look, especially if I'm not going to do much cleaning later, and on openwork like this, on some of the areas later on, I can't even reach. Why you carve the back of a pierced panel at all is covered in workshop 4.
One section didn't look too appealing to me at first, so I took a lot of wood out of that spot to make it more pierced. My goal was an excavation deep enough to go right through, because it's going to give us a really beautiful shadow. At least I think so. By the fifth video one part was completely in the air, not connected to the lower one.

Is keeping it clean the same as cleaning it up?
Two different jobs. This lesson shows both, and when I say cleaning here, I mostly mean carving. A #11 at one millimeter (1/32 in) went in during the third video to clean that mess on the inside. Further on I said I need to do some cleaning, lots of cleaning, actually, with a small gouge, 1/8 of an inch.
Keeping clean is the other job, about what your hands leave behind. Cleaning up without sandpaper has a page, and so does when to clean a carving up.

How do you keep the steel off the finished edges?
Put your own finger where the tool wants to push. Early in the lesson I said I have to keep an eye on how I touch this section, because first of all I can't pry, I have to be really careful, and secondly I want to keep it clean.
Then I showed the trick. I'm trying not to hit any of the edges with the tool, so I place my finger and make a leverage point where I can crank against my finger, but not against the piece of wood. The next video shows it in more detail. I pinch my fingers on the blade, keep one finger underneath, and pry against that finger instead. The metal doesn't touch the wood.

Near the end, on the ribbon, the same words came back: I'm using this finger as a leverage. Two frames here circle that gloved hand. The levering habit has a name, hoiking, and workshop 10 explains it on its own page.

Where do you rest your hands on work this thin?
Two points. When one part was in my way, I told you I must control the tool now, so I placed two fingers right on the wood and tried to make micro cuts. A little later I said it again: when I'm holding my hand, I barely touch anything, and those are the two main points where I support my hand.
I went slowly in the last video, and I said why. Right now I can't create too much pressure. If this grip is new to you, see carving with your hands off the work, from workshop 12.

Which tools reach into the hollows on this panel?
Small spoons, bent tools and tiny gouges, mostly. Early on I took a back bend at half an inch (13 mm), because this part was in my way, and with the back bend it's much easier for me to move upward, uphill. Next came a spoon gouge, a #8 at half an inch, for a concave cut.

For the deep hollow I used a #9 spoon at 5 millimeters (3/16 in). An even smaller spoon would work too, I said, about 2 millimeters (5/64 in), or a tiny Dockyard at 1/8 or 3/32 of an inch. An eighth of an inch and three thirty seconds are the sizes I keep naming in this session.

The tool cards in my frames say Pfeil on most of them, and Ashley Iles on the half inch #5 and the one inch #7. One small thing: the #12 spoon V tool I called 3/32 out loud reads 1/8 inch (3 mm) on its card.

Why carve across the grain here?
Control. When you're working cross grain, I said, you can actually control much better. I even caught myself on camera. First I said against the grain, then fixed it to cross grain.
Going the other way has its place too. Twice I say I'm against the grain here and it's okay, once with the tiny Dockyard on a concave cut, and once with a half inch number seven, where I called it absolutely fine.

Did I plan the piercing, or decide at the bench?
I decided at the bench. Early in the lesson I said maybe I can make it even a pierced look, so we'll see. Nothing is impossible, I said, and I'm pretty sure I can make a pierced look. I'm just not sure how it's going to look.
Two videos later I called it by its right name. I said the piercing instead of the gap, because that is a more accurate description. And I said I have to be really patient, because it is possible to overdo it, make a big mistake, and then it's not going to look nice anymore. The piercing here is gouge work, and piercing without a drill is a page of its own.
What is the law of repetition?
Doing the same idea again, on purpose. Here I checked that a straight #9 could reach, then said it's exactly the same idea I did right here, so I'll just repeat it on the inside, like a law of repetition in design.
My teacher in Russia, the fine art master I apprenticed with at 16, taught me that design is the laws of space, rhythm, repetition, and understanding the tools. You can watch the third one at work here.
How deep is the undercutting on this panel?
Very deep. Like I said before, I like extreme excavation, or undercutting, to make more of a shadow line. On one section I set a separation line with the V tool first and undercut it carefully, and I said there is not much control in that area. On the opposite side I could have chopped the extra wood out. I kept it instead, because I didn't want to waste that section, and started another acanthus there. Why anyone undercuts work nobody sees is answered in the Byzantine acanthus course.

Does pencil make a carving dirty?
After too much use, it does. Pencil came up in workshop 43 of this course, where I said pencil is also not the best idea, because your piece becomes really dirty after too much use. What you could use instead is just a V tool, as a marking tool. Here, before one undercut, a V tool pre-established my separation line.
Where does the ribbon go after this lesson?
Down, then over, then up. Near the end of this lesson I started on the ribbons. The ribbon has to grow from underneath going upward, then make a flip on its side, and flip backward.
One spot I didn't like. A flat gouge, almost flat, a #3 at 20 millimeters, three-quarter of an inch, worked it until it looked more or less like I want to see it. That is just a preliminary form, I said, of how the ribbon is going to move. The ribbon itself is the subject of workshop 14, on this relief panel.

Want to see the gloved work, the finger under the blade, and that one part end up in the air? Every workshop of the Hashemi course is inside the school, this one included.
How it's done
- Choose powder free rubber gloves. Any rubber gloves will do for keeping your skin off a carving, and the ones I wear are powder free, the medical kind.
- Or buy cheap cotton ones in bulk. Plain white cotton pairs cost little in bulk and you can wash them, though they give you little grip.
- Wear rubber-coated gloves for heavy waste. They give you better grip when big chunks come off.
- Keep the tool off finished edges. Try not to hit any edge you already carved.
- Pry against a finger. Pinch the blade, set a finger below it, and lever on that finger.
- Mark with a V tool instead of pencil. Pencil dirties a piece when you use a lot of it. Mark divisions using a V tool.
Frequently asked questions
Does washing your hands keep the wood clean?
Not by itself. However often you wash, some oil stays in your hands, and the wood still darkens where you touch it. On the Hashemi panel I wore powder free rubber gloves, and on other pieces I sometimes lay a paper towel over the finished part.
Are gloves part of every carving session for you?
Only sometimes, mostly on fragile work such as this panel. With bare hands I feel my tool much better, and even rubber gloves leave something like a block between my fingers and the gouge. Most of the time I carve without them.
Where can you buy gloves for carving?
Cheap white cotton ones come in bulk on Amazon, and you can even wash them. Rubber-coated ones grip better. You'll find those at Home Depot or Lowe's in the United States, and for this panel I used the medical kind, powder free, though any rubber pair would do.
What to carve next