
Alexander Grabovetskiy, woodcarver, School of Woodcarving · Published 2019
Is acacia wood good for carving?
Quick answer: Acacia wood is a sound choice for carving if you go easy on it. The Mediterranean acacia on this Bible box lid crackled under sharp tools, could throw splinters and turned tougher in some spots. Shallow relief and light, repeated passes let it hold fine detail.
Acacia wood is a good carving wood, just a crunchy one. Under a sharp gouge its fibers break instead of slicing, and you can hear it happen. Keep it shallow and work mostly across the grain with very light hands, and it will take detail from a veiner as small as half a millimeter (0.02 in).

Have you ever pushed a freshly sharpened gouge and heard the wood crackle under it? Did a small leaf point snap off anyway? Did one end of the board carve sweetly while the other end fought you?
Then you already know acacia, or something close to it.
The board in these pictures is the lid of a Bible box, and I carved the first layer of the design straight into it. It is Mediterranean acacia, the wood the people who sold it to me call gopher wood. The story behind that name lives in the course overview, so I will leave it there. This page is the bench side of it, thirteen videos boiled down to how acacia behaved under my tools and what I changed because of it.
What the acacia lid showed at the bench
- That crackle under a sharp gouge is the fibers breaking.
- One board carved like several. An almost black patch crunched even more than the wood around it.
- Clear the chips with a brush. Acacia can splinter.
- Tape goes on before the paper pattern, so no glue touches the wood.
- No acacia at hand? Black walnut is close in color and carves a bit easier.

What does crunchy mean when you carve acacia?
Crunchy means the fibers break rather than cut cleanly, even though my tool was really sharp. I am not sure it is the proper English word, and I said so while carving. For me it is still the best word I can find.
You hear it first. Partway through the first video I asked you, can you hear that crunch? You can detect it just by the way it sounds.
On a design edge, that crumbling is what hurts you. Press too hard and the tool slips, and it destroys the edge you want to keep. Where a spot is weak, the gouge can go straight through and break a piece off. No bueno, as I said a few times in these videos.

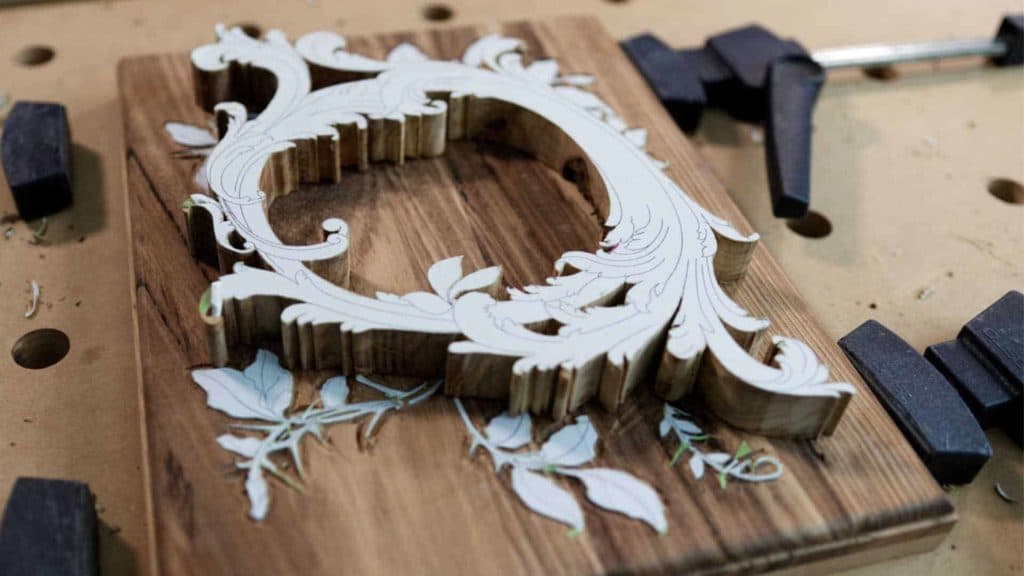
The scroll in the next picture is olive wood for the second layer, which comes later in the course. Everything under it is acacia.

Does one acacia board carve the same all over?
Mine did not. Different areas of this lid had different grain, and some parts were really crunchy. When I moved to the opposite side, that half was less crunchy. One area had almost black wood in it, and that part was even more crunchy, with a gorgeous grain all the same.
Hardness wandered too. Later, while undercutting, I told the camera that some areas were really, really tough, even for my sharp tools, and tougher still for the tiny ones. On end grain I had to be really careful, since this wood is not as soft.

So watch the first passes on any board you have not carved before. With a new wood you never know whether it will split, and if it never splits at all, you can break all the rules. Mine carved really nicely.
How hard is acacia compared with basswood?
Harder, and you feel it in your hand. It is not like basswood, and you have to control the tool a little differently. Late in the lesson I summed it up out loud. Hard wood, I can feel it, not as easy to carve as it looks and not so bad either. A good wood. I like it.

If you already know basswood, a few numbers show how far apart these woods sit. The Wood Database lists American basswood at 410 lbf (1,820 N) on the Janka hardness test, black walnut at 1,010 lbf (4,490 N) and white oak at 1,350 lbf (5,990 N). The table leaves the numbers out and sets the four woods side by side the way I described them while carving.
| Wood | What it did under my tools | Splinters, grain and color |
|---|---|---|
| Acacia | More crunchy than basswood, and really, really tough in some spots | It can give you splinters, and the grain is gorgeous |
| Basswood or limewood | Softer; acacia made me control the tool a little differently | Never gave me a splinter; its grain is almost invisible |
| Black American walnut | A little bit easier to carve, and not as crunchy | Really close in color, with a little different grain |
| White oak | Less crunchy than this acacia | Carve white oak and you can get splinters sometimes too |
Will acacia give you splinters?
Acacia can give you one, and basswood never gave me any. I said that while sweeping chips off the lid with my fingers, exactly what I was telling you not to do. Use a brush.
White oak can leave a splinter in you now and then too, and this acacia is more crunchy than oak. The brush has a second job. Every so often I swept the spot just to see exactly whether a chip was still stuck.

How deep should you carve acacia on a box lid?
Keep it shallow, about 1/16 in (1.5 mm) near the rim and no more than 1/8 in (3 mm) toward the middle. During the first video, 3/32 in (2.4 mm) turned out to be enough.
The lid edge has a quarter-inch (6 mm) round-over from the router, and I kept that rounded rim as the high point, bringing the background down inward from it. Seen from the side, the edge stays at one level all the way round. Go deeper, say 3/16 in (5 mm) or 1/4 in (6 mm), and it gets too obvious that you went from the edge in. I know some people do it, and nothing is wrong with that. My experience with furniture says an eighth of an inch is enough, so the slope does not distract the eye.

The undercuts stay small as well. There is not much material there, and I hope this box gets used every day. I would not go too deep in this wood anyway, because it is kind of crunchy and you can break the edge. Near the lines I left about 1/64 in (0.4 mm) of extra wood, just in case.
How do you keep acacia from splitting under the gouge?
Work across the grain wherever the design allows, because in this wood that is the safest way. It splits easily, and that mistake is impossible to fix. Which way the fibers want the tool to travel is a lesson of its own, carving with the grain.
Pressure is the other half. On most of this lid I barely pressed at all, and in the last video you can hear the tool hitting the inside of an undercut while I use almost no force whatsoever. Sometimes I held the gouge with just two fingers, pinching. Where the wood got crunchy I kept my hand about 5 mm (3/16 in) from the edge of the tool as a reference point, so it would not travel too far.

Several small passes beat one big one that ends in a big mistake. When a chip will not come free, do not force it out. Go around it again with the tool. That one is a really important rule.
I went against the grain on camera more than once, against all the rules, only because I did not want to flip the board in front of the cameras too often. Once I said it out loud, that I was still under control.

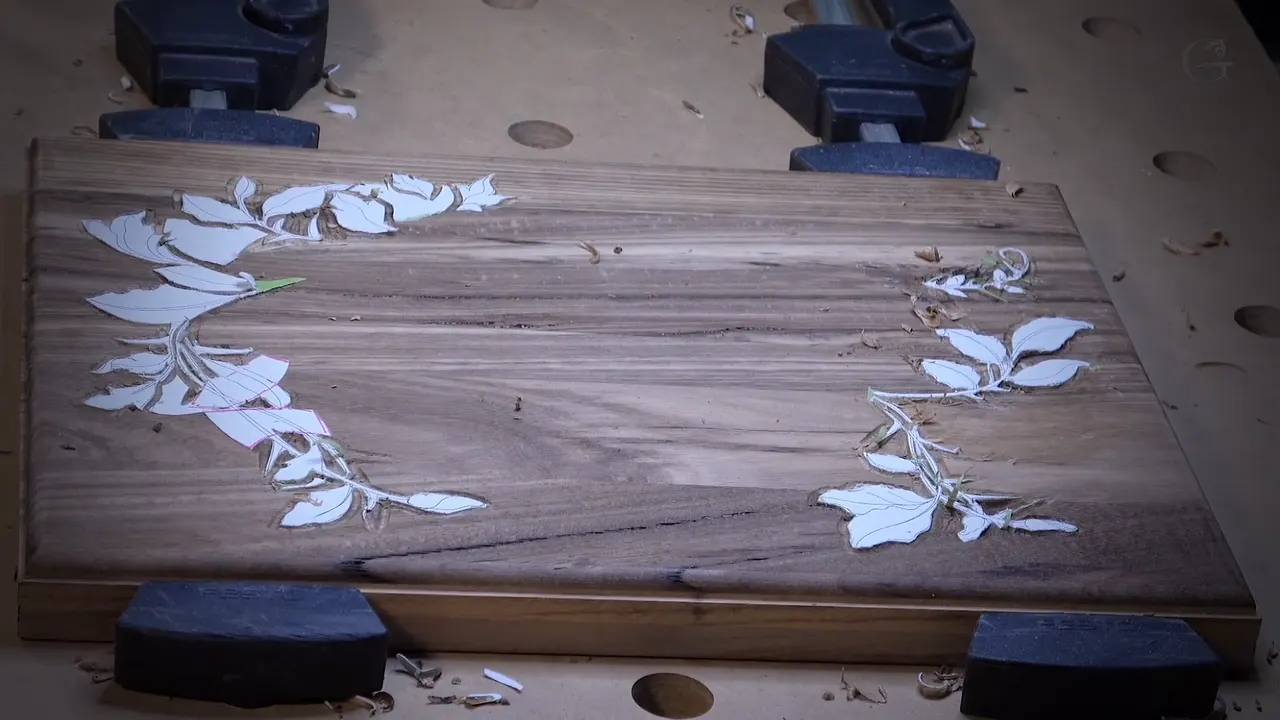
The tape saved me once, too. Before the paper pattern went on, I covered the lid with green painter's tape, the same way I did in the scroll saw lesson, so no glue would touch the wood. Near a thorn in the design I almost destroyed a spot, and the tool only scratched the tape. The pink lines on the paper mark areas that must stay flat for the second layer, and the pink marker was simply the first one I found on my workbench.
Every one of those passes is on video in the thirteen parts of this lesson. The school opens the whole box, flocked lining included.
Does the grain help or hurt a small carving?
Both. The grain is what makes acacia beautiful, and it is also the only disadvantage I found.
On small details the grain can get in the way. Even when you carve them nicely, your eye goes to the stripes as well as the carving. On the main layer, with its bigger shapes, I did not think it would cause a problem.

Dark wood hides small things too. A leaf ridge I kept high is almost impossible to see on a darker board, and I asked you to believe me that it would look beautiful anyway. So I changed the light. For the last video the lamp stood in front of me, angled, so each small ridge threw a shadow, and for close work I looked through a magnifier lamp.

Background punches solve the same problem around the leaves. Because the wood is dark, I planned to punch the ground so the small leaves stay visible. Mine are simple woodcarver's punches, a set of four. Without a set, search for background texture punches, or make one from a nail the way I show in the dotted background lesson.

A finish helps as well. Put oil or shellac on it, and those tiny details pop.
Which tools did the acacia lid need?
Two shapes did most of it. The outline went in with a number 11 veiner and the background came down mostly with a number 3, out of the half a thousand gouges, chisels and veiners I own.
For setting in I used a 3 mm (1/8 in) number 11 by Pfeil, and a 3 mm number 9 gives exactly the same result. The background started with a 10 mm (3/8 in) number 4 by Auriou, which equals a Pfeil number 3. Then I went up to a one-inch (25 mm) number 3 from Ashley Iles, and the bigger tool turned out to be an excellent idea. To take chunks out faster, a quarter-inch (6 mm) number 5 or number 6 does the job, even a number 7. A double-bevel number 1 shaves off the leftover ridge until it almost disappears.

The shadows came from two tiny veiners, 1 mm and 0.5 mm (about 0.04 in and 0.02 in), both number 11. For furniture makers I call that pair a must-have. The carving is really shallow, yet it looks applied, because the undercut under it is kind of deep. For the tightest spots I have a Dockyard double-bevel number 1 of about 1/16 in (1.5 mm), and those little tools are not expensive at all.

Keep all of them sharp. I did not know how abrasive acacia would be, so I kept an eye on my edges the whole time, and twenty-seven minutes into the first video I could still say so far, no problem. The sharpening course covers the edges, and all about tools explains the numbers.
What can you carve if you have no acacia?
Basswood will do, or limewood if you live in Europe, and black American walnut comes closest in color. Walnut has a little different grain, and it would be a little easier to carve, not as crunchy.
In basswood or lime you could even skip carving into the lid. Scroll the first layer from a separate piece about an eighth of an inch (3 mm) thick and glue it on as an onlay. Its grain is almost invisible, so it blends in, as long as the grain runs the same direction. On acacia I carved into the lid instead, so the first layer keeps the same grain as the lid itself. If you go with basswood, here is where I buy basswood.
Why carve acacia at all?
I like this wood a lot, and I said so more than once while carving this lid. It looks good and carves good, and the grain is beautiful.
Sometimes a customer hears my price for a carving and says, oh, for a piece of wood? That price is not for the wood. The wood is just the material. They pay for the carving itself, plus the hours and the design behind it, the same way nobody buys a painting for its linen.
Some members who joined the school call themselves beginners and never carved before, and they sent me pictures of their Hashemi flowers that made me proud. By now they understand it is not as easy as it looks. Acacia is the same lesson in a harder wood.
So is there a board in your shop you have been saving because it looked too good to carve? Take it down this week and listen to it under the gouge.
How it's done
- Tape the lid first. Cover the lid with masking tape, then glue the paper pattern onto the tape and never onto bare wood.
- Set in the outline. Go around every line with a 3 mm number 11 veiner and stay shallow.
- Lower the ground from the rim. Leave the rounded edge highest and bring the background down toward the middle with a flatter gouge, working crosswise to the grain.
- Shave the leftover ridge. Run a flat chisel, beveled on both faces, along the line where the blending cut meets the flat until it almost vanishes.
- Tuck in small shadows. Use a 1 mm and a 0.5 mm veiner for the small undercuts, and do not go deep in this crunchy wood.
- Check the ridges under a lamp. Brush the chips away, then set a lamp in front of you, angled, so each small ridge throws a shadow.
Frequently asked questions
Does acacia dull carving tools fast?
So far it has not. I was not sure how abrasive it would be, so I watched how sharp each tool stayed while I carved.
Why does acacia crackle when I carve it?
What you hear are fibers breaking instead of being cut, and it happens even with a really sharp edge. Press lightly and carve across the fibers where the design allows, which I did again and again on this lid.
What can I carve instead of acacia?
Black walnut, the American kind, comes closest in color and carves a little easier. Basswood or limewood work too, and their grain hardly shows, so an onlay blends in nicely.
What to carve next