
Alexander Grabovetskiy, woodcarver, School of Woodcarving · Published 2019
Why glue a carved overlay only along its center line?
Quick answer: A center-line glue joint is a single bead of glue along the middle of a sawn overlay, with both edges left bare. I used it on the olive wood layer of this lid so the gouge could hollow beneath the leaves without meeting any glue, and the fragile edges were the price.
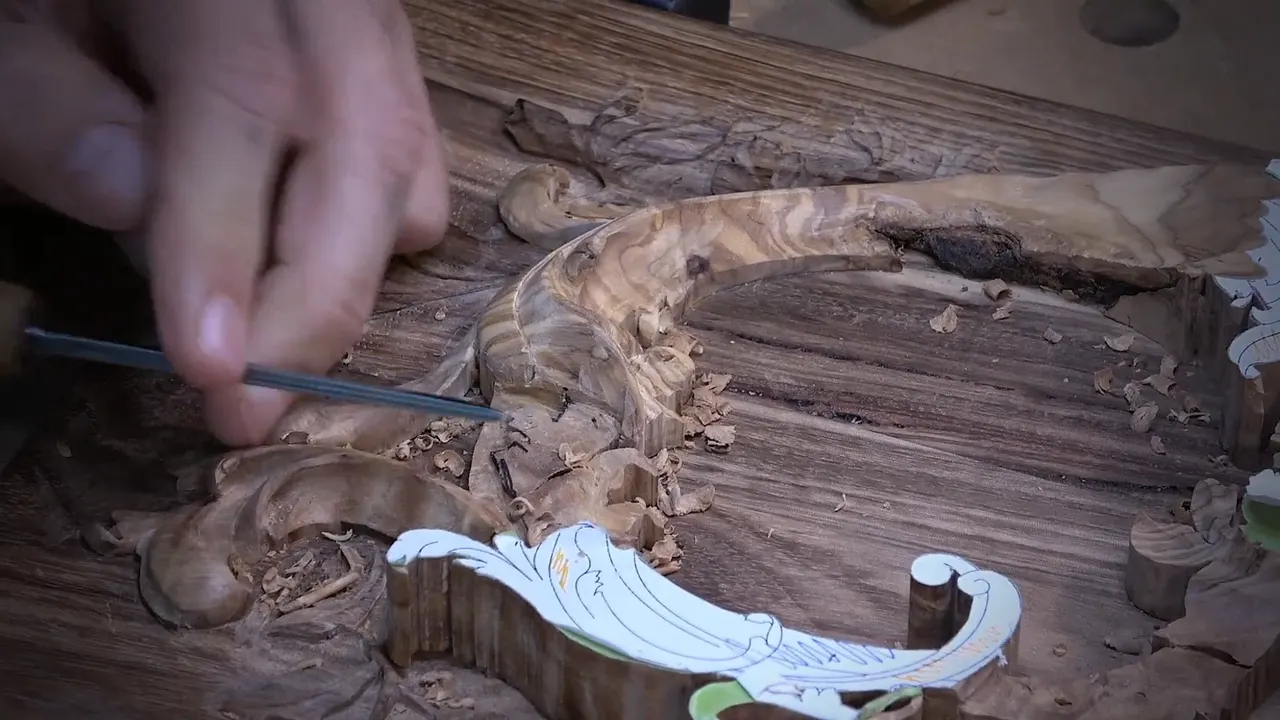
Center-line gluing is fixing a sawn overlay to the board beneath it with glue down its middle only, so both edges stay dry. On the olive wood layer of this lily box lid, that let me undercut the edges without digging squeeze-out from under a leaf before any stain went on.
Want to slide a gouge under a leaf and find clean olive wood there? Would you like the lid ready for stain with no glue line to scrape out of a shadow first? I wanted both. The thirteen parts of lesson five show what I got, and what the bargain cost me once those edges got thin.
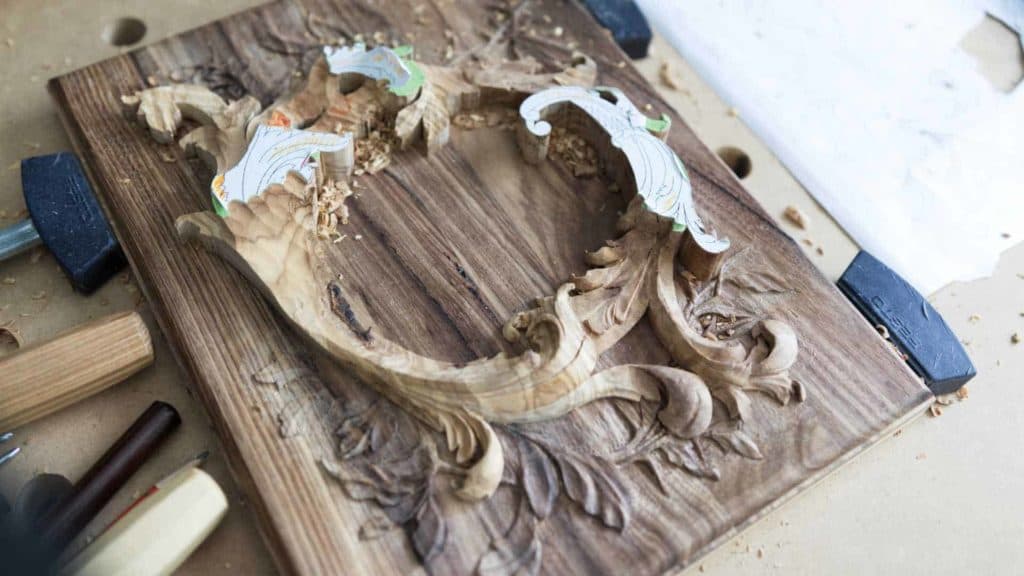
This lid belongs to a box that holds a Bible. The body is acacia, the wood sold as gopher wood, and the layer on top is olive wood sawn out on the scroll saw back in lesson one. Lesson five carries on with the second layer that began in lesson four, over more than four hours of video. I glued it down the center line and nowhere else, and nearly every undercut you will see leans on that one decision.

What the dry edges gave me, and what they took back
- Glue along the center line held the olive layer in place, and its edges stayed bare.
- The undercuts came out clean, with a single glue line showing up in part four.
- Bare edges are fragile under the tool, so a finger braces the work away from them and a small mallet goes in carefully.
- A crack opened in part five, and I left it for the shellac.
- Near the end a piece broke away and went back with glue and hand pressure instead of a clamp.
Why glue an overlay only down the middle?
Glue kept back from the edges can never ooze into the places the gouge has to go later. Leaves and curls all over this layer get hollowed underneath during the lesson, and at one spot in part ten the hollow reaches about 3 mm, an eighth of an inch, under the edge. Glue in there would sit exactly where the undercut runs.

The price shows up early. Back in part two I said it out loud. There is no glue under these curls, because I glued only the center line, and that makes them even more fragile. By part six one of two small volutes sits on the board with nothing holding it down, and I say I can feel it.

What does a dry edge let the gouge do?
A dry edge lets the gouge chop straight in under it and lift the waste out clean. Part two had two curls. My number 3, about 4 mm (5/32 in) across, chopped under them right away, and the waste came off, as I said then, without any mess.

Turned upside down, a quarter inch (6 mm) number 7 undercuts inward beneath a leaf. Part three is where I said what that buys you. The leaf looks light, almost like air, and it is still really solid. With no glue on the edges, part four adds, the surface comes out really clean and I can dig as deep as I wish.

The sawn edge needs work as well, since a scroll saw never leaves it perfect. I run a fingertip along it to feel for bumps, because on curly wood the eye can't tell whether a line is even. Then I find the gouge whose sweep matches the edge, in part ten a number 7 at 14 mm (about 9/16 in), lay it on, tip it a little, and carve inward.
The number stamped on a tool won't find that gouge for you. During part six a number 3 would not fit one curve and a Pfeil number 2 did, and later a Pfeil number 5 at 12 mm (about 1/2 in) fit perfectly. Brands put the same number on quite different sweeps. One Auriou number 3 of mine says 6 mm (1/4 in) and measures 4 mm (5/32 in) or less, so I hold the gouge against the line before I trust it.

No glue in the corners meant no mess to deal with. You could stop there, I said, and skip the undercut if deep undercutting isn't for you. I undercut it anyway.

Dry edges also let me undercut early wherever the design was settled. Part ten is one example, since I didn't expect to change the design there, and in part seven I warned that undercutting one spot too soon would be a big mistake.
Six moments across the lesson show the same dry edge from both sides.
| Part and spot | The gouge that did the undercutting there | What it gave me |
|---|---|---|
| Part two, the pair of curls | a number 3, chopped straight under the curl right away | clean, and no mess |
| A leaf, part three | a quarter inch number 7, turned upside down | no glue lines or squeeze-out to clean out before a stain goes on |
| The sawn outline, part four | flat number 3 | a shadow under the edge and nothing at all to clean up afterward |
| Small volute, part six | small tools, handled with care because it was loose enough to feel | nothing lost |
| Corners in part ten | the matching number 7, 14 mm (9/16 in) wide | a clean pass with no mess at the corners |
| Cracked olive, part thirteen | a number 9, started straight and rolled left | a piece let go, and it went back with glue |

Which gouges reach under a loose edge?
Small ones, taken in much the same order each time. Part one starts by putting the drawing back on the flattened layer. I cut the printed pattern into pieces and traced them, which is quicker than eyeballing it. The outline then gets set in with a number 11 at 3 mm (1/8 in), about 1/16 in (1.6 mm) or less inside the line and never deeper than that. The bulk comes out with the same number 11. Next the 1 mm (0.04 in) veiner goes in almost flat on one side and excavates, and a 0.5 mm (0.02 in) follows, because the smaller tool leaves a much deeper shadow. Cuts that small make a huge difference, as I said in part twelve.
Where an edge is too thin to lean on, a long bend number 11 of the same size reaches under without touching it. During part eleven I stopped to explain why the number 11 is called a veiner and not a gouge. It is the tool used most on flowers and acanthus leaves, and the veins come from it.

Under each flip I start straight down, then roll the gouge to the left and downward, and where the wood is crunchy, a relief cut goes in first. On camera my little veiner looks huge, though it is tiny, so you see the detail better than I do.
My middle finger rests on the work as a lever point, off the edge. The mallet is the smaller one, 12 ounces (340 g), and part eight is where I say to control how hard it lands. Even in part one I had warned myself that cranking too hard against one edge would break it again.

How deep can the gouge go under a dry edge?
Until light shows through, if you wanted, and on this lid I stopped short every time. Only the wood itself limits the tool when no glue sits in the way. In part five I said there is no end to how deep I can go, then took it back. Of course there is an end, I said, since I can go all the way through. But do I really need it?
Light would show through several of these hollows if I kept going. Part one says so. Under a curl in part two I was almost connected and stopped, because it already looked like a separate piece lying on top and casting a shadow on both sides. Olive wood is crunchy, so I kept some support. By part three I was asking myself whether to take one through, and I decided I wanted it solid.
Thickness has to stay, because this box will be used, hopefully daily, and I said so in parts two and eight.

Why is squeeze-out under an undercut so hard to clean?
Squeeze-out lands inside the very shadow you just carved, and cleaning it out of there is, as I put it on camera, a pain in the rear side of your body. A stain makes it matter more, and I said so in part three. On this lid a raw umber tint goes on near the end of the course, and part of its job is shading the low spots.
The dry edges kept paying off. Part four had me angling a number 3 under the sawn edge for its shadow, and I said there was nothing to clean up. The same part turned up one glue line after all, and I told the camera I don't like to see those glue marks.

Every one of those undercuts is on video, the clean ones and the ugly minutes too, and the Access page is how you get to watch them.
Does a glued second layer still read as one carving?
Low relief is what ties it together here. One area of this layer stands only about 3/32 in (2.4 mm) proud in part three, close to spots on the first layer, and I said that would tie the design together. Heights still change across the lid. One volute came down to about 5 mm (3/16 in), while other areas stayed near 10 mm, about 3/8 in, above the surface.
How two glued layers come to read as one carving is a lesson of its own, carved in Maine. So is how much wood a small detail needs under it before gluing.

What does gluing only the center line cost you?
Strength at the edges is the price, and in seven of the thirteen parts I say something is fragile or could break. Twice in part five I say a piece almost broke. Sharp tools matter more on wood like this, since hard wood catches the fibers, and in part nine I say one of mine needs sharpening.
Somewhere in part eight the grain gets so tight that the wood squeaks like an old door under the gouge, and I tell the camera I love that squeak. The flip was coming alive by then, I said. In part twelve I even apologize for my English, since what I lack there is words, not knowledge.
What happened when the olive wood cracked?
A crack opened on the inside in part five, while I was undercutting with a number 11. Just before that I had almost broken the same spot. The crack was mine, and I said that too.
It had not broken through, and I liked the detail too much to lose it, so I kept it and said the shellac, or whatever finish went on, would glue it back. Whether that worked is not in lesson five. Later in the same part another spot came out too rugged, and I called it fragile, almost broke, and said maybe it needed some glue.

What if a piece of the overlay breaks off?
Exactly that happened in the last minutes of lesson five, and the piece went back on with glue and my fingers. The olive wood in part thirteen has knots and curls, and cracks that run all the way downhill, and you can hear the gouge meet resistance. Too much pressure, I said, would be the mistake there. We could deal with those cracks with no problem, I added, and a breath later, I hope. Past the knots I went halfway from one side and then came in from the other.
The number 9 went in straight and rolled to the left and down. Then I said the area was really fragile, that the cracks inside called for smaller tools, and that maybe I had to glue it. It came apart right then. There was no glue under it, of course.
My explanation on camera was micro cracks in the wood itself, sometimes too small to detect, and not a mistake by the carver. After that came the thing I had avoided for the whole lesson. I said I didn't want to see too much squeeze-out, and in the same breath that in this case it was okay.

I pressed the piece down with my fingers and did not clamp it. The squeeze-out got wiped right away, and what was left, I said, can be carved out. Not good, but that's all right, I guess. The lesson ends with the glue still wet under that piece.

Want your next undercut to come out clean? And would you like to know where the glue goes before the gouge ever touches the layer? Then watch where it goes on this lid, and where it stays away.
How it's done
- Keep the glue in the middle. Glue the sawn olive layer to the board along its center line. Keep it well away from both edges, so nothing squeezes out where you will undercut later.
- Put the drawing back. Trace the printed pattern pieces onto the flattened layer.
- Set in the outline with a small veiner. Stay just inside the line with the 3 mm (1/8 in) number 11. Go no deeper than a sixteenth of an inch (1.6 mm).
- Excavate below the edge. Clear the bulk with that same veiner. Then lay a 1 mm (0.04 in) one almost flat to excavate, and deepen the shadow with a 0.5 mm (0.02 in).
- Brace with a finger. Rest a middle finger on the work as a lever point, well off the thin edge, and keep the mallet light.
- Glue back what comes loose, then wait. Put glue under the piece, press it down by hand and wipe the squeeze-out at once.
Frequently asked questions
Can you undercut an overlay that is glued at its edges?
You can, but squeeze-out sits right where the gouge has to go, and all of it has to come out of the shadow before any stain. On this lid I kept the glue to the center line of the olive layer, so the edges stayed dry. Any glue that does squeeze out should be wiped away at once.
Does a layer glued only down the middle stay put?
The center line held for everything lesson five shows, and the trouble came at the edges instead. A small volute in part six was loose enough that I could feel it, so I worked it with small tools and a lot of care. Thin parts near a dry edge stay fragile, and my fingers stayed off them.
What should you do when a thin carved part cracks?
When the crack has not broken through, you can keep carving and leave it alone. That was my choice in part five, because I did not want to lose that detail, and I expected the shellac or another finish to glue it back. Whether it did is not shown in this lesson.
What to carve next