
Alexander Grabovetskiy, woodcarver, School of Woodcarving · Published 2024
What causes the notch when you sharpen a V-tool?
Quick answer: A V-tool notch is a little point, like a notch almost, that appears along the edge during sharpening, usually near the keel. The factory left one wing thicker than its partner. Sharpen the keel before anything, and after it bring each chisel side to that point, slowly.
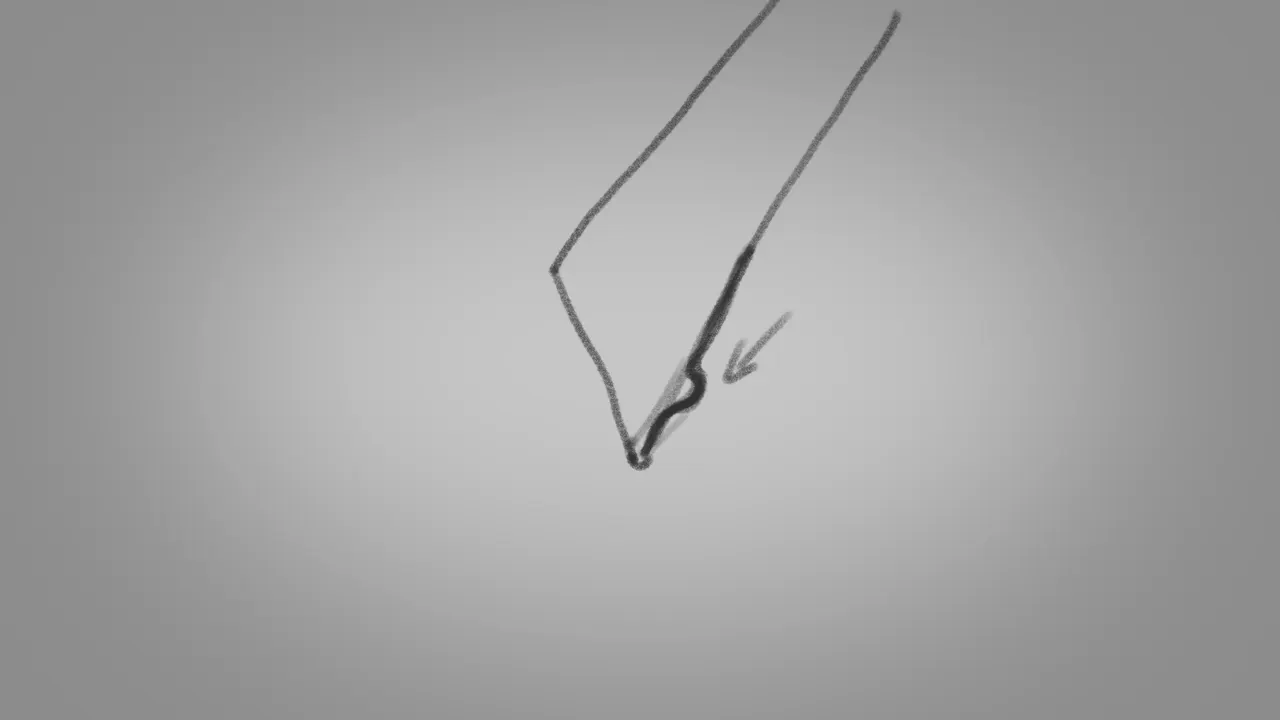
The notch in a V-tool is an uneven point that shows up on the side of the edge as you sharpen it, most of the time closer to the keel. It's not your fault. This one is actually the manufacturer's fault, and there is a way to deal with it.

Turn a V-tool around and see its end. It looks like the letter V, right? And you would expect both sides of that V to be the same? With a V-tool, that is almost impossible. And that is where the notch comes from.
This lesson answers one of your questions, and probably most wood carvers have to deal with it. I was getting emails from you asking how to deal with that. Some of you even tried to fix it on your own, and then you had to buy another tool. My apologies that I did not make this lesson quicker.
For some reason this tool gives the most headaches. You buy it from the store and bring it home, and if it is sharpened well, you can use it for a while. Then you start sharpening it, and it can be somewhat difficult. Doesn't matter how long you carve or how experienced you are. Some people call it a parting tool. I'm going to address only one common problem with it, and I'll try to explain.

The notch in five short lines
- It's an uneven point, almost a notch, and it tends to sit by the keel.
- One wing comes out thicker, because the machining of the center is off.
- Any brand can have it, cheap or the most expensive.
- You sharpen it as a small gouge with a chisel on each side.
- Do the keel before the sides, then blend each side to the notch, really slowly.
Where does the notch show up on a V-tool?
Anywhere along the edge, but mostly near the keel side. Sometimes, while you sharpen, a point like this shows up, and you go and remove some of the material and still don't know what to do.
Some people see it right at the point of the keel. The angle of your tool changes nothing. Yours could be a 60-degree V-tool, a 35, a 45 or a 90, and the problem will be there all the same.

I could not show it to you on a real tool, because I don't have a bad tool in my arsenal. It's all taken care of. I've got multiple V-tools, but none of them bad, so I got my iPad and drew it for you.
In the micro tools lesson I went on a hunt like that. I wanted a tool the way it comes from the manufacturer, and most of mine were already reshaped, until I found one. Tools coming out from a manufacturer are not shaped correctly, I said there, and the main stage of sharpening is to reshape. Big or small, the bevel it came with was not the best bevel. The people making those tools don't really care about creating the right one, and there are different opinions about what degree it should be.

Why is one wing of a V-tool thicker than the other?
The machining of the center is off. Look really, really carefully at how wide the steel is on those wings. Those are the wings of the tool.

On my tool, one side is off from the other. The right-hand side is much, much thicker. Not much, but it makes a huge difference. I even had to find a better marker to point at it for the camera.

Sometimes what you can do is take your tool, grind it, and check the top profile. You're going to see that one wing is thicker.
Now picture how a manufacturer makes a V-tool. They start from a solid block, just a solid steel block, and they have to machine right inside it.

When they place the bit, one side comes out smaller and the other side thicker. Say the thinner part is on the left, and the bit they used to take out the inside was slightly twisted. Then the point of that machining is going to lean toward that edge.

You sharpen. You take some shavings of steel off that side, and you get really close to that point. That creates the notch.

Problem number one. Here is another one with the same machining, where the bit goes much, much deeper. Then the weak spot can show right on the bottom of the keel, or any of those spots. So that's why it happens.

At the in-person class on the Maine Coast I saw it go another way. We zoomed in on a V-tool, and the bit inside was pretty much true, but the outside machining was off, completely off. Even the thickness of the walls was different, and it got thinner the nearer you came to the edge.
Gouges can have it too. In the back bent gouge lesson I said the metal thickness is sometimes not consistent, and you will see waviness. That waviness is not going to affect your work. You see it in how the tool looks, and I do have some wavy tools myself. On that back bent I left about a hairline before the edge, or it gets just too wavy.
What I care about is sharp. I told that Maine class I can do a medical operation, surgery, with my tools. And some of the guys with really straight tools can't even dig in wood, because it's rubbing. But the tool looks good.
Do expensive V-tools get the notch too?
Yes. Brand makes no difference. Cheap tools made in China, or expensive tools like Pfeil, Ashley Iles or Henry Taylor, any brand, the most expensive you can get or the cheapest, and you'll have the same problem.

Some tools are really bad, whatever manufacturer made them. The one I showed you in this lesson is a Swiss-made Pfeil, with a 15 stamped on its steel.
Done by the most expensive CNC machine or hand forged, it's the same story. Getting really consistent thickness on both sides of a V-tool is almost impossible, and those wings are going to be a little different. Each spot the notch shows up has its own cause and the same fix.
| Cause | Shows | Fault | Fix |
|---|---|---|---|
| Bit off center | One wing thinner, notch on a side | The manufacturer's | Keel first, then blend that side |
| Bit slightly twisted | The thin spot leans toward one edge | The manufacturer's | Shave that side slowly toward it |
| Bit went deeper | A weak spot on the keel's bottom | Machining again | Same rule, the keel goes first |
| Expensive tool too | Almost impossible to make both wings consistent | Every brand | Go slowly and you'll be okay |
Why treat a V-tool as three tools in one?
Keep in mind it is three tools in one, and once you understand that, it's not a problem. You have to sharpen it as three tools.
Look first at the bottom part, the one that isn't really sharp. A tiny gouge, but still a gouge, with some curvature, so it does not come out to a sharp point. I treat that part as tool number one, and I call it a gouge.
Then come the sides, this side and that side, your chisel number one and chisel number two. Gouge, chisel and chisel. The bottom has a name too, the keel, like a boat keel.

Once you understand that and don't overwhelm yourself, it's not that complicated whatsoever, I told the Maine Coast class. Still, this is the hardest tool for some people. Somebody in that class told me it was hard for them. Maybe, I said, because you didn't treat it as a chisel, chisel and gouge, or gouge, chisel, chisel.
My Greek acanthus leaf shows the chisel parts at work. I placed one chisel part of the V-tool at 90 degrees down to outline. Then, to remove the waste, I laid it on the flat of that chisel part and used it as a chisel. I had an 8 mm (5/16 in) Pfeil there, and a 6 mm (1/4 in) 45-degree V-tool, also by Pfeil, which gets into really tiny spots. With a 45 you can see where your 90 degrees is, so you control more. You can go straight down with it and just chip away.
I took my mallet and outlined little by little, keeping an eye on how deep I went. Apply too much force near an area like that, and you can easily destroy it.
Which part do you sharpen first when the notch is there?
The keel. If your tool does not have any problem, you can probably start with your chisels and then work the keel. That's approach number one.
But I think the better approach, especially if your tool has that tendency and it's way off, is to attack the keel side first, the back of it. Create whatever bevel you want there, even with that point showing.

Then take one of the chisels and slowly, slowly shave that side, trying to make it even with the point. That point becomes the main point you blend to. The same idea works on the other side, and everything goes to that point.
Let me repeat one more time. The rule is to work on the keel first. Even if you have that notch, work your keel, then blend your sides to the notch, but do it really slowly. Little by little, and you should be okay.
Same thing if the point sits on the keel side, on a side, or right at the point of the keel. Keel first, then your chisel.

I said it this way to the Maine Coast class. Both ways will work. I usually like to get the gouge side longer, and then you bring that chisel to the gouge. I held the blade with my left hand and worked with two hands. I know the metal problem, I said, and I know the pressure. Sometimes I have to press harder to get to the edge, and sometimes I have to press less.
What you sharpen with makes no difference, a Work Sharp like I use, a Tormek, any other machine, or just by hand. I explain how I approach the whole job in the lesson before this one, sharpening the V-tool. I'm not going to do the sharpening here, because like I said, I don't have any tools like that.
Does every wood carver use a V-tool?
Not every wood carver has one in the arsenal. It was not common until, let's say, the 19th century in Europe. Some wood carvers never use it even nowadays, because of the problems. An excellent tool, don't get me wrong. But it was not an everyday tool.
I love the V-tool, though, as I said carving the furniture panel. I joke that it is the only tool I kiss when I walk into my shop every morning. Good morning, V-tool.
Then I told you the truth about it. If we want to be true to the original wood carvers of the 18th century, not all countries where they made furniture had V-tools. Even nowadays, not all wood carvers in the world know the V-tool exists. I know it sounds strange, but it's the truth. Some European wood carvers never use one, and back in history they had lots of veiners and gouges.
In Roman acanthus lesson 16 I said the ancient carvers did not have any V-tools at all. They had gouges, and I showed that work done with a number 11 veiner. The V-tool was invented later. One of my favorite tools, but you don't have to have it.
Still, for relief carving it is one of the most important tools in your arsenal, and of course the gouge. On the Roman acanthus volute I set the main outline with my V-tool, about an eighth of an inch away from the final line, three millimeters, sometimes two or five. Any V-tool will work there, a 60 or a 45. In that segment I used mostly the V-tool, keeping an eye on the grain, and cleaned up with a number 7, one of my favorite gouges.
Normally the end of a V-tool is straight, at 90 degrees, so you can get to the wall and not hit anything. To reach under an undercut I reshape it, putting a bevel on the wings so I'm not damaging the undercut. Mostly I use just a straight one, or one with the wing taken in that direction.
I hope this answers your question. If it wasn't clear, let me know. I'm trying my best, but if I can improve, tell me. You'll find the V-tool lesson and the gouge lessons in the Carving Tool Sharpening course. If you want to sharpen and carve with me, come and carve with us.
How it's done
- Look at the wings. Look really, really carefully at how wide the steel is on each wing. One is often thicker.
- Think of three tools. One small gouge at the bottom, which is the keel, plus two chisels on the sides.
- Attack the keel. Work the back of the tool first and create whatever bevel you want there, even with the point still showing.
- Shave one chisel side. Slowly, slowly, until it is even with that point.
- Do the other side. Same idea. Everything goes to the point.
- Take it slowly. Do it really slowly and you should be okay.
Frequently asked questions
Is the notch on my V-tool my fault?
Not yours, the manufacturer's. They make a V-tool from a solid steel block and machine the inside, and one wing comes out thicker. Sharpening takes you close to the thin spot, and the notch appears. I have had emails from carvers who bought a second tool over it.
Which brands of V-tool have this problem?
Any brand I named in this lesson. Cheap tools made in China, and expensive ones by Pfeil, Ashley Iles and Henry Taylor, all have it. Most expensive CNC machine or hand forged, getting really consistent thickness on both wings of a V-tool is close to impossible.
Does the angle of the V-tool change anything?
Not for this problem. In this lesson I listed 60 degrees, 35, 45 and 90, and the notch can show up with any of them, on the keel or on a side. So the order of work stays too, the keel and then the chisels.
What to carve next