
Alexander Grabovetskiy, woodcarver, School of Woodcarving · Published 2018
What is a T-stop in ornament design?
Quick answer: A T-stop happens when one line in an ornament runs head on into another and simply stops there. The junction makes the shape of a letter T, the eye travelling along that line hits a wall, and the whole composition loses its flow. Curve the arriving line instead.
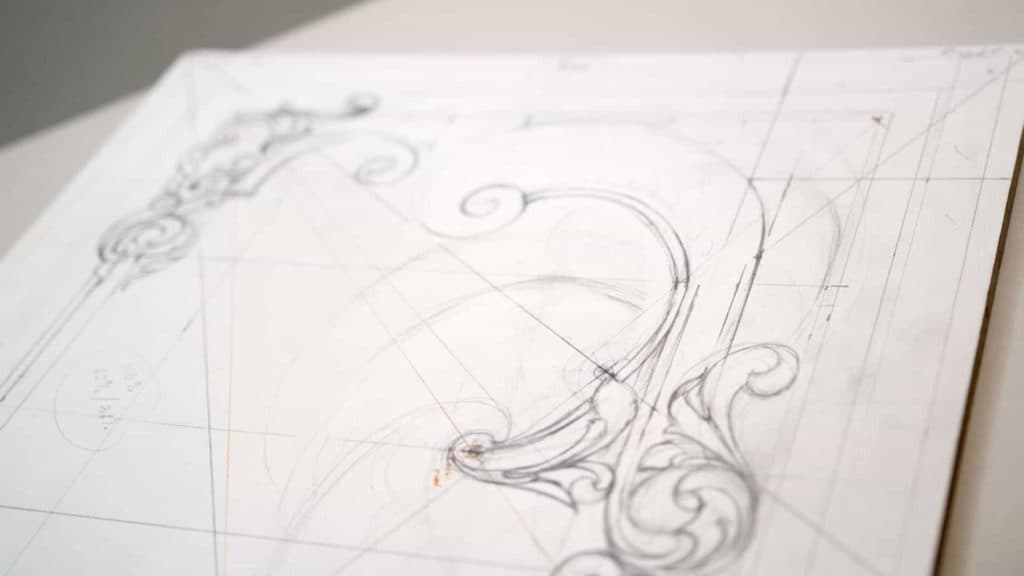
A line in an ornament must never dead-end against another line. When one runs straight into a second and stops, you get what I call a T-stop, and it kills the flow of the whole composition. Tie them instead. Bend the arriving line so it joins rather than collides.
Ever looked at your own drawing and felt something jam, without being able to say quite where it happened? Or had a leaf that was correctly shaped and still left the panel stuck? Look for the place a line arrives and simply stops. That is almost always it, and the fix takes one curved line.
This lesson is mostly small corrections of that kind, plus a piece of pure geometry at the end that will give you a decent circle on a board of any size, in about two minutes, using nothing but a pencil.

The rules doing the work in this lesson
- No T-stops. A line that meets another must turn into it, not butt against it.
- Step back from the board now and then. Faults that are invisible at arm's length are obvious from six feet.
- Tape rolls make a better arc than a free hand, and nobody will ever know.
- Eyes of a leaf sit on a chosen line, and the claw is the movement running inside it.
- A perspective line to the corner tells you what belongs in an empty area.
- Four diagonals and eight dots will give you a circle, no compass needed.
What exactly is a T-stop?
Picture a line running across the paper, and a second line arriving at it head on and stopping there. The two draw a letter T between them, and whoever is travelling along that second line hits a wall. It has nowhere to go next, so it stops travelling and the panel stops with it.

I cannot put a leaf in like that. It breaks the rule of the flow, it will not look nice, and it will not look organic. Even a stop that is not a true 90 degrees still counts if the movement simply ends there against something.
Once you know the shape you start seeing it everywhere, including in compositions that are otherwise good. A fault of that kind is structural, and the carving itself is never the problem.

Fixing a T-stop
Tie the lines together with a curve. Instead of arriving head on, the second line bends as it approaches, runs alongside for a moment, and merges. Now the eye carries through the junction and keeps travelling.
In this lesson I have a vertical line and a diagonal that need uniting. The movement could go either way round; both work. I take the curl one way rather than the other, and the choice is mine, but the requirement to curve is not optional.

Think of it the way water joins water. A tributary meeting a river at a right angle looks wrong even in a photograph. Every ornament tradition that lasted, Baroque included, ties its junctions instead of stopping them.

Why step back from the board?
It is good practice once in a while just to step away and look at the composition from a little distance. Overall development, the whole picture, rather than the square inch under your pencil.
Close up you judge a curve by its last half inch. From six feet you judge it as one movement, and that is the only judgement that matters, since nobody views a finished panel with their nose against it. An arch that felt awkward while I drew it looked organic once I stood back, so it stayed.

Do the same with the carving later. Put the gouge down, walk to the far wall, and let the relief tell you whether the shadows are working. The carving stage depends on it.

Is it cheating to use a round object for a curve?
Not cheating in the least, and I do it on camera. Some masking tape was left on my bench from another job, and its edge makes a truer arc than my hand does. Find the one whose radius is closest to the curve you want and draw round it.

The freehand purists can carry on freehanding. A curve that wobbles reads as a wobble, not as character, and the viewer has no idea whether you used a template. What they see is whether the arc is honest.
| How the curve gets drawn onto the paper | What that method gives you | Where it lets you down |
|---|---|---|
| Freehand | Speed, plus a line with some life in it on a day when your hand is behaving | Wobble |
| A round object off the bench | A true arc in seconds | Only the radii you happen to own already |
| Compass | Any radius at all, and repeatable | Puts a hole in the paper at the center, and the center often falls off the board entirely |
| Square and diagonal construction | A circle of any size from a pencil and a straightedge | Two minutes |
Where do the eye and the claw of an acanthus go?
Eyes go on a line you have chosen in advance. I draw a couple of arches inside the leaf as subdivision points, pick the second one, and place my eyes along it so they agree with each other rather than wandering off across the lobe.
Every acanthus leaf has an eye, often many of them, and if the term is new to you the leaf itself is covered properly in our acanthus course. The claw is my own word for the movement running inside the lobe, the little hook that turns at a lobe tip.

Both are detail work, and detail is what this style runs on. The panel is shallow, so what makes it read is quantity of incident rather than depth. The Corinthian leaf is the same problem at a larger scale.

Subdividing a leaf into lobes
With arches that repeat the movement the leaf already has. Two or three curves inside the outline, each following the same flow, and the lobes appear between them. Subdivision points, I call them.

Keeping them parallel to the flow is what stops a leaf looking chopped up. A subdivision that cuts across the movement fights the shape it is supposed to describe. The background spaces between lobes then drop lower in the carving, which is where the shadow comes from.
Repetition applies here too. If one leaf returns in a particular direction, something nearby should answer it, and the answer belongs at a different size. The previous lesson set the movements these leaves are filling.

Why repeat the same 5 mm everywhere?
One dimension, said several times, ties a panel together better than four different ones ever will. My outside band is 3/16 in, 5 mm, so the band inside it is 3/16 too, and the ornament thickness echoes the same figure again.
I measure it line to line, and mostly I am eyeballing. You do not have to measure it, though if you want to, please do. What matters is that the eye keeps meeting the same interval and reads the panel as one object instead of a collection of decisions.
Carrying that interval around the board is where the paper strip earns its place again. Mark the distance off an inside line, carry it, rule the new line, and it lands exactly parallel without a number ever being written down. One of those new lines turned out to repeat the vertical lines already on the board, which is pure geometry if you wish, and pure luck it is not.
Old moldings work the same way. Count the intervals on an egg and dart run and the same handful of numbers keeps coming back. Our border lesson sets all of them.

Where swirls get their energy
By growing. A swirl that starts small, then repeats bigger, then bigger again, carries the eye along with it. Four identical swirls carry nothing. The growth is the energy, and it is the same principle as a musical phrase that climbs.
Small movements matter enormously to me for that reason. They are where the sequence starts, and a viewer who never consciously registers the little one will still feel the build. Drop it and the big volute arrives from nowhere.
Depth joins in. The spaces between those movements drop lower and become background, so the growing sequence is also climbing out of the panel as it travels. On 5 mm of stock that climb is fractions of a millimeter. Plan it on paper.
And when a placement will not settle, I try the 0.62 proportion from one end, look at it, then try it from the other end instead. Same rule, two directions, and one of them usually looks right. I am still not always sure you can see what I see, and that is the honest limit of teaching this through a camera.

The perspective line, and what it is for
Finding out what an empty area wants. I take a point on the drawing, run a line from it all the way to the corner of the panel, and that single line usually tells me what belongs in the space it crosses.
Here it suggested a swirl, then a small acanthus, and the acanthus won. Without the line I would have been guessing at a shape for an area with nothing in it, which is how panels end up with one corner that never quite settles.

Lines like that are also how you fill toward the main point rather than away from it. A movement should travel to somewhere, and the major focal point is usually where. Getting all of this into wood needs steel that behaves, which is what our sharpening course and tools course are for.
Do you have to fill every empty space?
No, and I stop to ask myself that in this lesson. There is an area I could fill completely, and I am not sure the whole thing wants filling. An ornament needs somewhere for the eye to rest as much as it needs incident.
What usually fixes an area I dislike is not more detail but a better boundary. When a shape refuses to settle, I go back and fix the boundary line around it, often making it larger than I first drew, and the shape inside it suddenly works. The fault was rarely the leaf.
Returns help too. An acanthus that comes back on itself fills space while still moving, which is quite different from stuffing an area with small details. One return, carried to a line that already exists, will do more than three new leaves.
And the law of repetition keeps applying at every scale. If a movement runs one direction here, something over there should echo it, which fills the space and ties the panel together in the same stroke. Our beginner course starts students on exactly this habit, long before anything as involved as this panel.

Drawing a circle when you own no compass
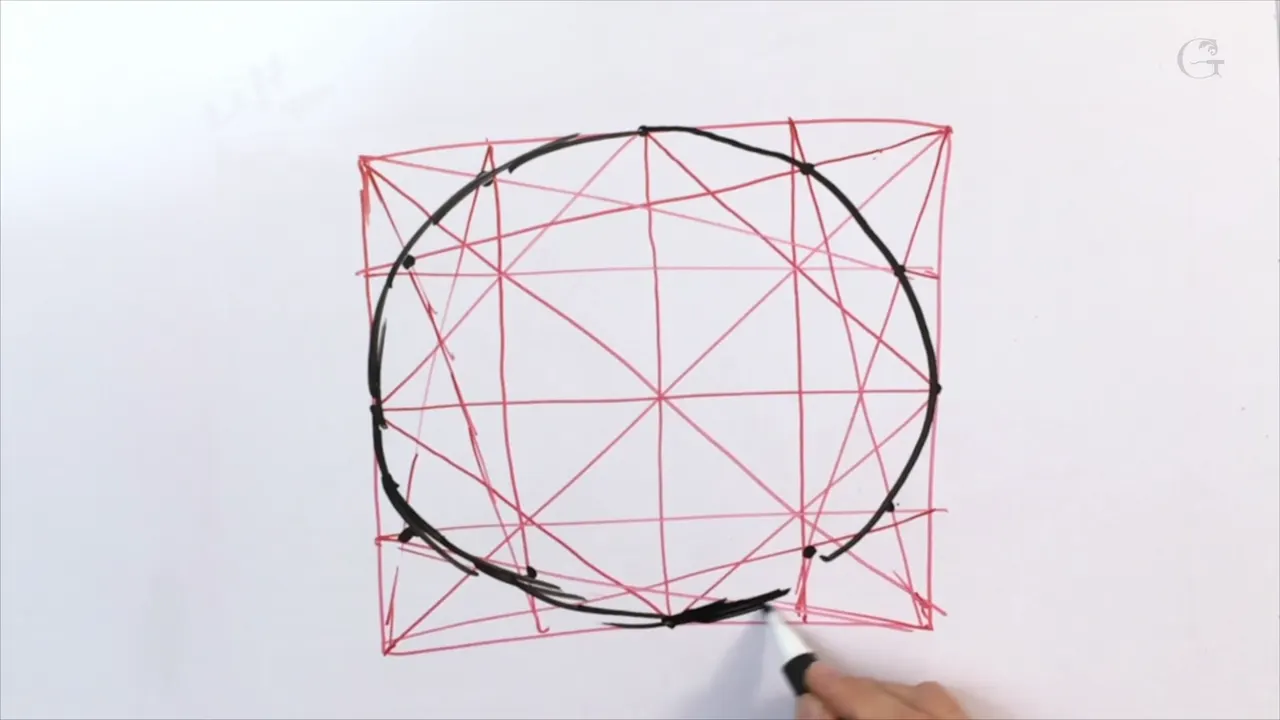
Pure geometry, and two minutes is all it costs. Start with a square at the size you want, then rule both diagonals so they cross at the center and add a vertical and a horizontal through that crossing.
Now connect the points where those lines meet the sides of the square. A diamond appears inside it. Take further lines corner to corner through the points that produces, and eight intersections appear, spread evenly around the middle. Join those dots in a smooth curve and you have a circle.
Mine, drawn quickly and by eye, comes out pretty accurate. Spend longer with a straightedge and it comes out accurate enough for anything. Nothing is punctured, nothing is bought, and it works at any size including ones no compass in your drawer could reach. The same construction underlies a spiral and the volutes on an Ionic capital.
Want the rest of the method rather than one lesson of it? Come and work through the panel with us, or start with the course itself and our guide to carving woods.
One habit ties all of this together. Before any correction I put the pencil down, look, and decide whether the thing in front of me is actually wrong or merely unfamiliar. Those are not the same fault, and only one of them needs fixing.
Nobody looking at the finished panel will know that a roll of tape drew one arc and eight pencil dots drew a circle. They will only know that the thing holds together, which is the only thing any of this was ever for, and the one thing a viewer will actually notice.
How it's done
- Hunt for the dead ends. Run your eye along every line in the drawing and find where one arrives at another and halts. Those junctions are where a composition jams, and nothing else explains the feeling.
- Curve the arriving line. Bend the second line as it approaches so it runs alongside the first and merges. The eye then carries through the junction rather than stopping at it.
- Stand back and look. Walk six feet away every so often. Close up you judge a curve by its last half inch; from a distance you judge it as one movement, which is the only judgement that counts.
- Borrow a radius off the bench. Masking tape draws a truer arc than most hands. Find the roll whose radius suits the curve and draw round it. Nobody examining the finished panel will know.
- Set the eyes along one subdivision. Draw two or three arches inside the leaf, pick one, and place every eye along it. The claw, that little hook at the tip of a lobe, goes in afterward.
- Run a perspective line to the corner. When an area is empty and you cannot see what belongs there, rule a line from a point on the drawing out to the corner. It usually answers the question for you.
- Build a circle from a square. Draw a square and cross its diagonals, then add a vertical and horizontal through the middle. Join the midpoints of the sides, take further lines through the result, and eight intersections give you the circle.
Frequently asked questions
What does a T-stop look like on a drawing?
One line arriving at another head on and halting there, making the shape of a letter T. Flow dies at that point because the eye has nowhere to travel next. Even a junction that is not a true right angle counts if the movement simply ends against something.
How should a line that dead-ends be corrected?
Bend it before it arrives, so it curves alongside its neighbour and merges rather than collides. Which way round the curl travels is your choice; curving at all is not. Think of one stream joining another.
Is it acceptable to trace a curve from an object?
Perfectly acceptable, and far better than a wobble. Anything on the bench with a suitable radius will serve, masking tape included. Viewers cannot tell how an arc was drawn, and they can tell at a glance whether it is true.
What to carve next