

Alexander Grabovetskiy, woodcarver, School of Woodcarving · Published 2018
How do you turn layout lines into a carved ornament?
Quick answer: Ornament grows out of lines ruled in the earlier lessons. Each leaf begins where one line runs and stops where another ends it, so nothing floats loose. Bound a leaf before detailing it, sit its eyes on a chosen line, and let one corner answer the corner opposite.
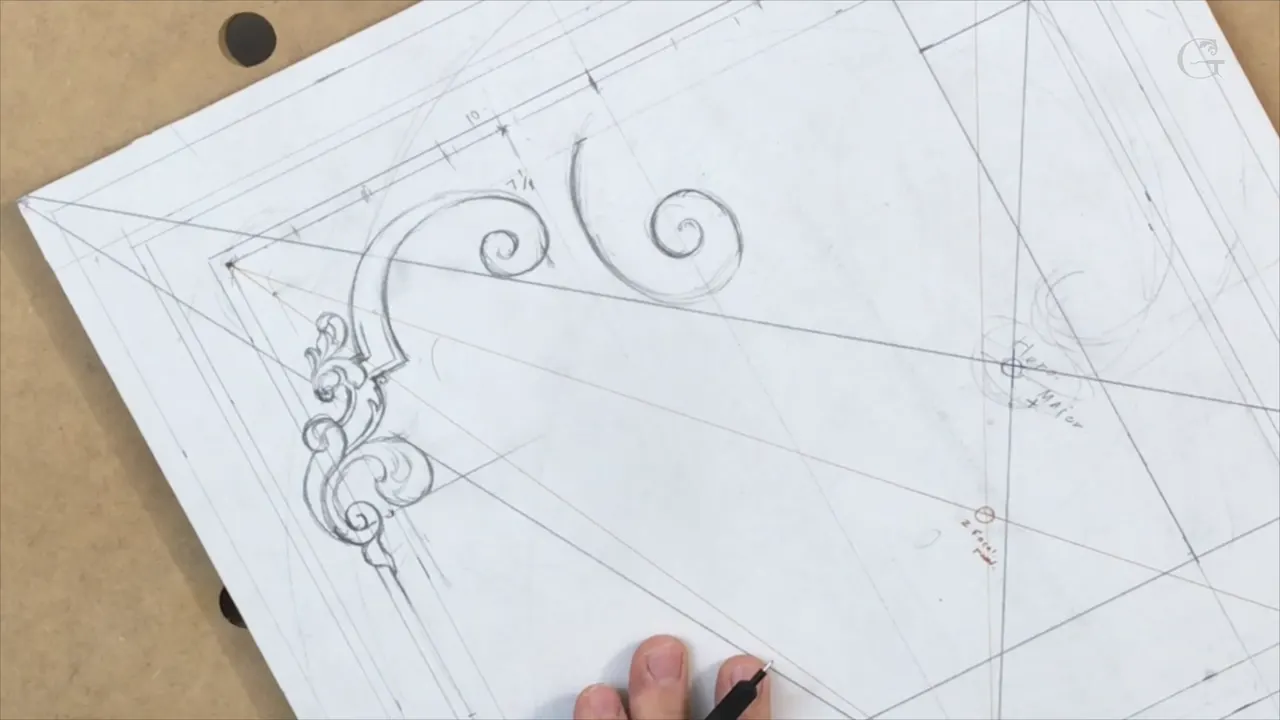
An ornament grows out of the layout lines, not on top of them. Every leaf and curl on this panel starts where a line already runs, ends where another line stops it, and ties into its neighbour rather than butting against it. The drawing looks free. Almost none of it is.
Ever drawn an ornament that had good parts and still felt wrong as a whole? Ever moved one leaf, then found three others no longer fit? The word for what is missing is flow, and flow is not a feeling. It comes from where the lines already were.
This lesson is the first one with real ornament in it. I work the top corner, put in an acanthus, take it out again, and say out loud about nine times that I am not happy. Welcome to the job, and it is most of the job. Here is what I am actually deciding while the eraser is out.

What makes a drawn ornament hold together
- Everything has to interweave. A shape that only sits beside its neighbour is not connected to it.
- Draw an acanthus from the outside in. Bound the whole leaf first, then subdivide it.
- Every eye of a leaf sits on a line you drew earlier, never wherever the pencil happened to stop.
- Repeat a corner movement in the corner opposite. Then break one on purpose.
- Ornament thickness echoes the molding at five millimeters, eyeballed rather than measured.
- Doubling a border is normal in furniture work, and three millimeters between the pair is enough.
Why does everything have to interweave?
Ornament that fails almost always fails here. I draw a movement, look at it, and the parts refuse to hold hands. Everything has to interweave, organically connected, and as of that moment it is not, so out it comes.
Interweaving is the difference between a pattern and a plant. Real growth loops back through itself, the way a vine does when it finds something to hold. One leaf comes forward, a stem passes behind it, and a curl returns to touch something it left three inches ago. Draw shapes that merely sit in a row and the eye walks past them without stopping anywhere.

What makes this workable rather than mystical is the lines from the earlier lessons. Staying inside them helps me enormously, because a movement that runs to an existing line has somewhere to arrive. Two lessons of pencil work with nothing to show buys exactly that. If you have not seen how those lines got there, the previous lesson builds them.

Where does an acanthus leaf actually start?
Outside boundary first, and I call that shape the boat. Draw a long shape like a boat hull, point it whichever way your movement travels, and you have the space the leaf will occupy. No detail in it yet. Just the envelope, and the envelope is the decision that matters.

Then you subdivide. The inside of that boat gets broken into lobes, the lobes get their own center lines, and the leaf appears inside a shape you already approved. Work the other way round, detailing as you go, and the leaf ends up whatever size your enthusiasm made it.

The method travels. A volute gets its spiral bounded before its coils are drawn. So does a flower. Carvers have been building leaves this way since the Ionic capital, and the full treatment lives in our Roman acanthus and Corinthian acanthus courses.

Where do the eyes of a leaf belong?
On a line that already exists. Every acanthus has an eye, usually several, and those eyes are where the lobes turn and the shadow pools. Scatter them by feel and the leaf looks nervous.

So I find a line running through the area and place my eyes along it. One, then another, then a third, all sitting on the same line. Three eyes in a row, agreeing with the geometry underneath, and the leaf reads calm even though nothing about its outline is straight.
That trick is invisible in the finished carving. Nobody will know why your leaf looks settled and theirs does not. They will only see that it does.

Where each decision comes from
| The decision | What actually settles it in the end | Where it goes wrong |
|---|---|---|
| Where on the board a leaf is allowed to begin its run | An existing layout line, always | The shape floats, and no amount of detail added later will ever anchor it |
| The acanthus width | Whatever width the molding already measures, echoed across | Two different thicknesses end up arguing across one small panel |
| Where an eye is placed | One line carried right through the whole leaf | The leaf reads restless |
| What belongs in the opposite corner | Repetition, with one exception broken on purpose so it is not wallpaper | Dead symmetry, or nothing rhyming anywhere at all |
Can you find a new point within a shape drawn earlier?
Same way as the big ones, at a smaller scale. Take the two points that bound the space, divide the run between them into ten, and count six. That lands you on roughly 0.62 of the way along, which is the golden number again, and it holds within one leaf exactly as it holds across a whole board.
I do not reach for a rule at this scale. Find the middle by eye, then split one half again, and the sixth part is close enough. My hand is doing arithmetic the way a musician tunes by ear, and the panel will never tell the difference.
What that buys is a reason for every placement. Ask me later why a curl begins at that particular spot and the answer is not that it looked nice there. Six parts out of ten, from the two points that were already on the board. Ornament built like that survives being stared at.
It also survives being scaled. Redraw this panel at half the size and the proportions hold, because none of them was an inch measurement in the first place. The course pillar shows where the whole arc goes.

Why double the border?
Furniture carving does it constantly, which is reason enough on its own. The doubled band is extra detail and it adds beauty, and any antique you look at closely will be full of that kind of doubling.
Spacing is small. About an eighth of an inch, near 3 mm, between the two lines. Any more and the pair stops reading as one feature and starts looking like two things that did not agree. Any less and a gouge cannot get in there cleanly.
Look at a Chippendale panel or a Baroque frame and count the bands. There are always more than you expect, and each one is doing a small job of separating one depth from another. The widths themselves are all set out in our border lesson.

How thick should the ornament be?
Same as the molding, near enough. My moldings run 3/16 in and the acanthus carries roughly that width too, which is the whole answer. One repeated dimension across a panel does a surprising amount of work.
And I am not measuring it. Eyeballing, straight off the drawing, because the point is the relationship rather than the number. Once you have a thickness on the board you can match it by eye all day, which is faster and just as good.

Depth stays shallow. Under 5 mm of relief for the whole panel, so the design has to earn its three dimensions from detail rather than from depth. So I want as many details as the surface will carry, almost micro carving, and why micro tools come out later in the course. Stock matters by then as well, and our wood guide covers which boards will hold detail at that size.
What do you do when a corner refuses to work?
Repeat it, or break it, and decide which on purpose. If a movement runs one way in this corner, the opposite corner wants an answer to it. The law of repetition is doing its work at the scale of the whole panel.
Then I break one. This corner has to repeat that corner or that one or that one, and instead I am going to break it and put something else there. A composition where every corner agrees is a wallpaper sample. One deliberate exception is what turns four corners into a design.
A right angle hides in this as well. The corner movement wants to sit at about 90 degrees to the ones near it, which repeats the geometry of the panel itself rather than fighting it. Composition at this level is mostly a set of agreements between marks that arrived earlier, and breaking one of them has to be a decision you can defend. Rococo looks like it broke every rule of this kind and mostly did not.

What happens when you draw too much in one place?
You wipe it out, and I did. At one point this corner had too many volutes in the same area, so out they came. A spiral is a strong shape, and three of them within two inches start competing rather than singing.
The fix is usually a change of kind rather than a change of number. One of those volutes became an acanthus leaf instead. Same space filled, same movement carried, but now two different families of form share the corner and neither shouts over the other.

Size does the same work. Where two curls do belong together, one comes bigger and its partner smaller, never matched. And where two leaves meet I overlay them, so one passes in front and the other behind, which gives depth on a panel that only has 5 mm of it to give.
All of that is easier to say than to do at the bench, and it is easier at the bench once it is settled on paper. That is the trade this whole course is built on. Our rosette course makes the same trade at a smaller scale, and the carving stage is where this drawing finally meets steel.

Why am I not happy with it yet?
It does not flow yet, and I would rather say so than pretend otherwise. Count the times in this lesson: not happy, not quite happy, semi-happy, still not happy. Then the eraser, then a different line.
Please be patient with me while that happens. I want a piece of art here, authentic to the end of the 18th century, and that takes as long as it takes. A student watching a design appear cleanly in twenty minutes learns nothing useful, because that is not how any of this works for anybody.
Right now I am only laying in the main movements. Details come after, and plenty of what goes down today will be redrawn before the panel is finished. No carver in the Gibbons tradition arrived at a panel like this in one pass either.

How small do the details get?
Small enough that we reach for micro tools. This kind of carving lives on the quantity of detail rather than depth of cut, and some of these leaves will end up close to micro carving by the time they are in wood.
That changes the drawing. A tiny volute has to be drawn tiny and still be readable, which means fewer lines rather than more. A leaf half an inch across gets three lobes, not seven. Crowding a small shape is how detail turns into mud.
Multi level helps too. I take one area deeper than the one beside it, so the same shallow panel reads as several planes stacked. Getting that right in wood needs sharp steel; our sharpening course and the tools course both matter by then. Want to carve the panel rather than read about it? Come and work with us.
One last thing about working this slowly. A movement that starts wide and runs narrow, or starts narrow and opens out, carries far more life than one of even width, and you only see which way it should run once several of them are on the paper together. So the drawing gets worse before it gets better, and there is a stretch in the middle where the board looks like a mistake. That stretch is where most people abandon the drawing, reach for the gouge, and spend the next week fixing in wood what an eraser would have fixed in a second.

A pattern you trace will give you one panel. Knowing why a leaf sits where it sits will give you every panel after that, on boards that are not this one, in rooms I will never see.
How it's done
- Start every shape on an existing line. Pick a line already ruled on the board and begin the movement there. A shape that starts nowhere will never settle, however good its outline turns out to be.
- Bound the leaf before you detail it. Draw the outside shape first, the long hull I call a boat, and point it the way the movement travels. Only then break up what is inside it.
- Subdivide into lobes. Break the boat into lobes with curves that follow the same flow. Each lobe gets its own center line, and the leaf appears inside a shape you already approved.
- Place the eyes on one line. Find a line crossing the area and sit every eye along it. Three in a row, agreeing with the geometry underneath, and the leaf reads calm.
- Match the ornament to the molding. Carry roughly the molding width, five millimeters on this panel, through the acanthus as well. Eyeball it rather than measure; the relationship is the point.
- Answer the corner opposite. Repeat a corner movement across the board, then break one deliberately. Four corners that all agree give you wallpaper instead of a design.
- Erase and start that part again. When a passage refuses to flow, rub it out rather than decorate around it. Paper costs a second. Finding the same fault after the gouge has been through it costs the panel.
Frequently asked questions
What does it mean for ornament to interweave?
Shapes have to pass through and behind one another rather than sit side by side. A stem goes under a leaf, a curl returns and touches something it left earlier, and the whole thing loops like a growing plant. Forms placed in a row read as pattern instead.
Where should you begin when drawing an acanthus leaf?
Outline the whole leaf first as a single long shape, pointed the way your movement travels. Detail comes afterward, inside a boundary you already like. Working the other way round gives you a leaf whose size was decided by how carried away you got.
Where should the eyes of a leaf be placed?
Along a line that already exists in the layout, never by feel. An eye is where a lobe turns and shadow collects, so scattering them makes a leaf look restless. Nobody will see the line afterward, and everybody will see that the leaf sits calm.
What to carve next