
Alexander Grabovetskiy, woodcarver, School of Woodcarving · Published 2018
How do you find the golden center on a board that is not in golden proportion?
Quick answer: Golden center construction needs no calculation on an awkward board. Rule one line along the full diagonal, then a second from the square you built off the width, carried on to the opposite corner. Their crossing marks the point, and the pair serves any proportion of stock.
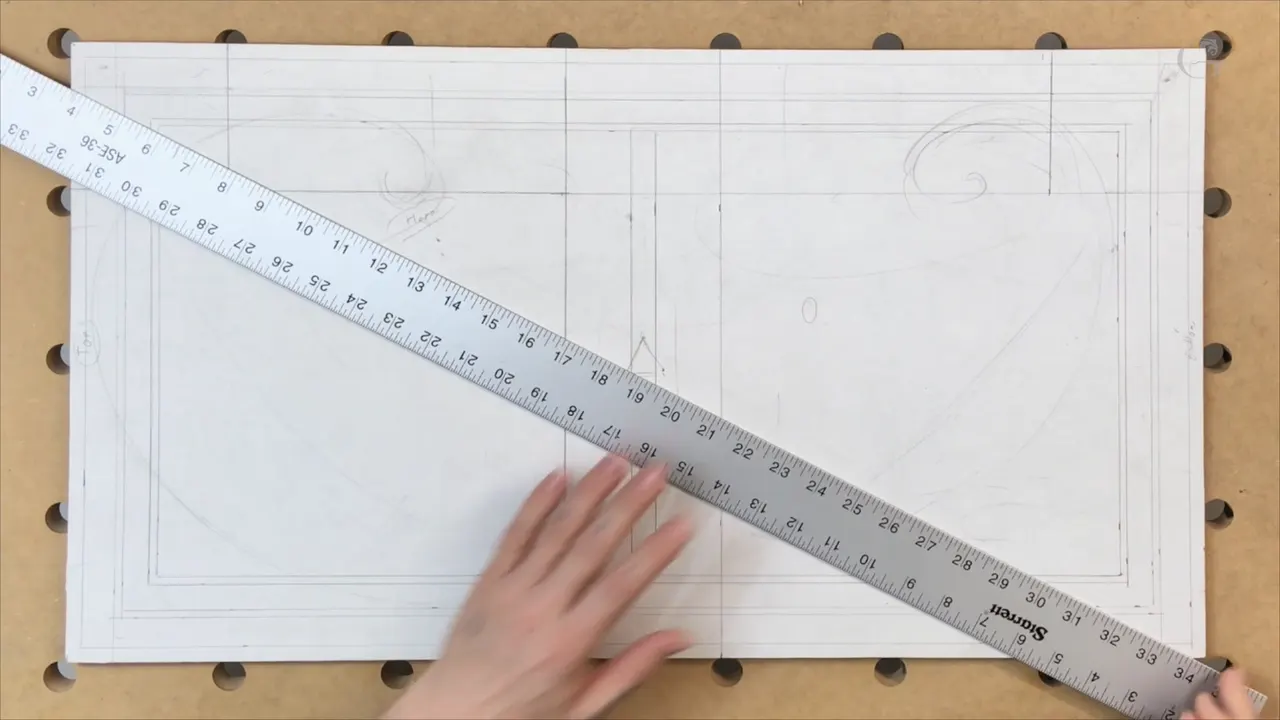
The golden center of a panel can be found with two straight lines and no arithmetic at all. Rule one line across the full diagonal of the board. Rule a second from the true square's inner corner, carried on to the opposite corner. Their crossing is the point, and the pair works on any shape of stock.
Ever tried to work out a proportion on a board that is simply the wrong shape, and given up? Ever measured to a sixty fourth of an inch and still not trusted the answer? There is a way round both, and old shops used it long before anybody owned a calculator.
A student asked me why I drew the big square first, then the perimeter moldings, and only then the small square. Fair question. The answer explains the whole method.

What the two diagonals actually give you
- A true golden ratio board runs 1 to 1.618, and my walnut does not, which is true of almost every real board.
- Two ruled lines beat a calculation, and they meet exactly on the point you want.
- The major center answers to the outer boundary, edges and all.
- Its minor partner is found within the borders drawn last lesson, and it lands somewhere else entirely.
- Four marks in the end. Hero and antagonist on the outside, two more inside.
- Halving a gap by eye beats measuring to 1/64 in, every single time.
Why draw the big square before the moldings?
Order comes from the board, and my board is the problem. Take a piece 10 in wide, 254 mm. In true proportion the next measurement lands near 157 mm, a shade over six inches, which is that width multiplied by 0.618. Set the two side by side and the old masters would know the canvas at a glance.

Mine is nothing like that. Measure my panel honestly and the second part lands well outside where it should, so I cannot simply step square inside square inside square until the numbers agree. The board refuses.
So I take the biggest true square the width gives me, fix the moldings off that, and only then build the smaller square inside them. Each stage inherits from the one before. Skip a stage and the inner square has nothing honest to measure from.

Where do two ruled lines put the golden point?
Lay the rule along the longest diagonal and draw the full line. Do the same the other way. An X now crosses the whole board, and it takes its orders from the outer boundary, frame allowance and all.

Next comes the line that does the real work. Start at the near corner of your true square, the one built off the width, and carry it out past the outer corner. Where that meets a diagonal, put a plus. Major center found.

Repeat the whole construction from the far end and a second crossing appears. That one gets a minus, since it carries the antagonist. Nothing gets multiplied, and the tape measure never enters the argument. Geometry does your arithmetic, and that is why this trick travelled shop to shop for centuries.

What separates the major center from the minor one?
Scale, and which boundary you measure to. My major center sits on the outer edge of the board, frame allowance included. The minor one is found the same way but inside the perimeter of the bands, where the ornament will actually live.

Both are golden points. They simply land in different places, and the panel needs both. The outer pair tells me where the weight belongs. The inner pair tells me where a viewer settles once the borders are framing everything.

I switch to a lighter pencil for the second set. By now the paper carries the golden lines from the first lesson, the bands from the second, and two diagonals, and I want to know which line is which tomorrow morning. Getting lost in your own drawing is a real thing, and my goal is not to be lost.
Four crosses end up on that board. Major, major, minor, minor. Every leaf and volute that follows is hung on one of them.

The four centers and what each one decides
| The center | Measured from what boundary | What it decides on the finished panel |
|---|---|---|
| Major, the plus mark | Full size of the board, frame allowance counted in | Where the heaviest cluster sits |
| Major, the minus mark | The same outer boundary taken from the opposite end | Answering cluster, quieter, holding the lower half together |
| Minor on the hero side | Within the drawn bands | Where an eye finally comes to rest on the panel |
| Minor at the far end | Within the bands at the opposite corner | A small detail that keeps the bottom of the panel alive |
How do you divide a line into ten parts by eye?
Two marks and then the middle. Rather than measure a thirty second or a sixty fourth, I set down the two positions I am sure of and halve the space between. Close enough, and I say so out loud while doing it.

One of my inner divisions came out near 29 mm per part, an inch and an eighth, give or take. Count six of those ten and the proportion arrives, roughly 181 mm along. Later, on a shorter run, six parts came to about 105 mm.
None of that pretends to be exact. Accuracy here means the eye, and 1/64 in sits far below anything an eye will read on a carved surface. Chasing it costs an afternoon and buys nothing. If you want the arithmetic instead, 0.62 of the length gets you to the same place, and the Fibonacci sequence is where that number comes from.
Repetition turns up here too. My molding band measured 5/8 in, near 16 mm, so I marked another 5/8 further in. Same width, said twice, and the panel gains a beat it did not have.

Where does the first volute go?
On the hero side, at the point marked with a plus, and it curls toward the center of the board. One curl, then a second beside it, and both carry through until they meet in the middle. First ornament on the panel after two lessons of straight lines.

Volutes mattered to furniture makers in the 18th century, and they mattered a long time before that. Greeks and Romans put them everywhere they could, most famously on the Ionic capital, and carvers have been repeating that spiral ever since. A golden spiral and an Archimedean spiral are not the same curve, and both turn up in ornament.
My spiral for the outer composition starts at one point and sweeps the full board. The inner one behaves differently, because it sits with the smaller square inside those moldings that look applied and are not. Want to carve this panel properly rather than read about it? Come and work through the whole panel with us.

Why is the second volute smaller?
Rhythm needs music in it. Repeat a shape at exactly the same size and you get pum, pum, pum, pum, which is a fence. Repeat it at a different size and you get something an ear would call a phrase and an eye calls ornament.
So the big curl on the hero side gets answered by a much smaller one. Same form, same family, a fraction of the size. Further along I break the molding line entirely and slip another small volute into the gap, which is the same idea used a third way.

Somewhere near the end of this lesson I marked out one more border, 10 mm or 3/8 in inside the last, and found six parts of ten along it at roughly 4 1/8 in. A good spot opened up there, and I started the beginning of a small acanthus move. That same leaf runs through our Roman acanthus and Corinthian courses.

Will all those lines really make sense?
They will, and I understand if right now they do not. Even I said out loud in this lesson that it was getting complicated for some of you. A board covered in pencil looks like somebody spilled a geometry set on it.
What changes is that the lines stop being lines and start being boundaries. This one stops a curl going too far left. That one marks where a molding begins. Another says the movement may travel this way and no further. Once a mark has a job, it is no longer clutter, and the composition starts steering itself.
The movements come out organic because of this, not in spite of it. A curve that runs until it meets a boundary feels grown rather than placed. A curve drawn freehand across an empty board usually looks like what it is, which is a guess. Same hand, same pencil, completely different result.
My own habit is to sit and look before every new stroke. Where is my flow going. What can I develop here. Those lines tell me where the design is located, and they answer faster than my instinct does. Instinct guesses. Geometry does not. If you are still building the skills underneath this, our beginner course and the tools course are the ground floor.
Can you design something new and still stay in period?
Exactly what I am after on this panel. My goal is something nobody carved before me, nobody designed before me, and yet still sitting in the style of the late 18th and early 19th century. Furniture makers were doing this at the start of the 20th too, and some of us are doing it now.
The way through is the geometry. Period style is not a catalogue of shapes you copy, it is a set of proportions and habits. Get the proportions right and a new arrangement of leaves will feel like it sits inside the period, because the bones underneath it are the same bones. Copy the shapes without the bones and you get a reproduction that somehow looks wrong to everyone.
So my volutes are mine. Their placement is not. The Baroque instinct for a strong point answered by a weaker one, the shallow relief, the borders that read as applied molding, all of that is inherited. What sits inside it is new.
Leave a space, I keep telling myself while drawing. Room matters as much as ornament, and a beginner fills every gap. The border lesson is where that habit starts, and it carries all the way through to the carving itself. Choosing stock that can hold this kind of detail is its own question, and our wood guide covers it.
What happens when a line lands in the wrong place?
You rub it out. I did exactly that in this lesson, on camera, and left it in. My line should have been further over, I said so, and I got rid of the wrong one before going on.
Nothing about that is unusual, and there is no version of design where the pencil is right the first time. An eraser and a preliminary line are how a panel gets found. Carving has no eraser, which is precisely why all of this happens on paper first.
By the end of the lesson the board carries the golden lines, the bands, two sets of diagonals, four crosses, one big volute with a small partner, another volute breaking through a molding, and the start of a leaf. It looks like a mess and reads like a plan. Nobody but me would make sense of that sheet, and I no longer need to, because the marks have done their work already. The next lesson starts turning it into an ornament, and the course pillar shows where the whole thing ends up.
One more note on those crosses before the leaves take over. Every center on that board serves the whole panel, outside boundaries included, which is why I never treat the frame allowance as dead space while I am drawing. It is hidden, not absent. A composition that ignores it drifts, and the drift shows up months later when the door is hung and something about the panel sits half an inch off. Our rosette course takes the same care over it. A habit like that outlives any single job, which is exactly why it gets taught before a gouge ever comes out of the rack, and why a whole lesson here holds nothing but pencil work.
Anyone can copy a spiral off a drawing. Knowing which two lines put that spiral where it belongs on your own board is a different skill, and it is the one that lasts.
How it's done
- Build the true square first. Take the biggest square the width of your board allows and mark it. Everything later is measured off that square, so it goes down before the moldings and before the inner square.
- Rule both diagonals. Lay a straightedge along the longest diagonal and draw right across. Do the same the other way. That X now belongs to the panel at its full size.
- Draw the line that finds the point. Begin where the true square meets the border and run a line to the far corner of the board. Where that meets a diagonal, put a plus. Major center.
- Repeat at the far end. Running the construction again from the far side gives a second crossing. Mark it with a minus. One point carries the heavy cluster, the other its quieter answer.
- Run it again inside the bands. Change to a lighter pencil so you can tell the sets apart. Repeat both constructions within the inner perimeter and two more crossings appear, and those decide where a viewer settles.
- Split gaps by eye, not by rule. Set down the two positions you trust and halve the space between. Anything under 1/32 in sits below what a carved surface will show, so chasing it wastes the afternoon.
- Hang the first volute on the plus. Start the curl at the plus mark. Sweep it toward the middle of the panel, then answer it later with a much smaller partner.
Frequently asked questions
Does this diagonal method work on any size of board?
Any size and any proportion, which is the point of using it. Two straight lines expose the relationship your particular board already has, rather than forcing a number borrowed from a panel with different dimensions. Square stock, long stock, awkward offcuts, all the same construction.
What are the plus and minus marks for?
Plus goes on the stronger of the two centers, minus on the one answering it. Writing them straight onto the paper stops a carver losing track once the board fills with pencil, and a board at this stage fills up fast.
How accurate does a layout line need to be?
Accurate to the eye, never to the tape. A carved surface throws shadows that swallow a thirty second of an inch without trace, so splitting a gap by halves is enough. Precision belongs to the joinery, not to the drawing underneath an ornament.
What to carve next