
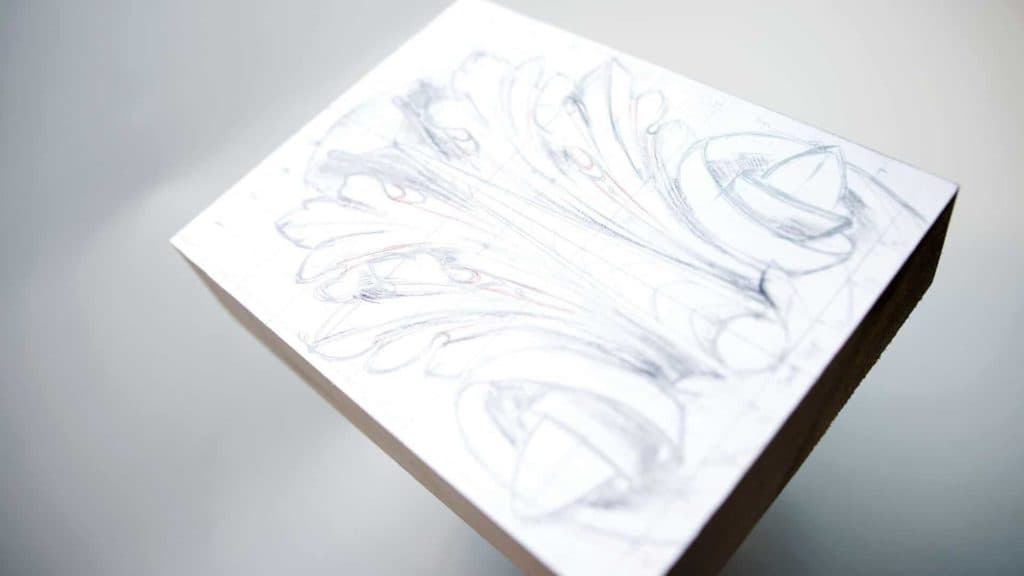
Alexander Grabovetskiy, woodcarver, School of Woodcarving · Published 2018
How do you draw a symmetrical acanthus leaf?
Quick answer: Drawing a symmetrical acanthus leaf is a grid problem before it is a drawing problem. Divide the board into ten equal parts each way and put a figure on every line, so each point on the left half has a twin at a known address on the right. The leaf follows from there.
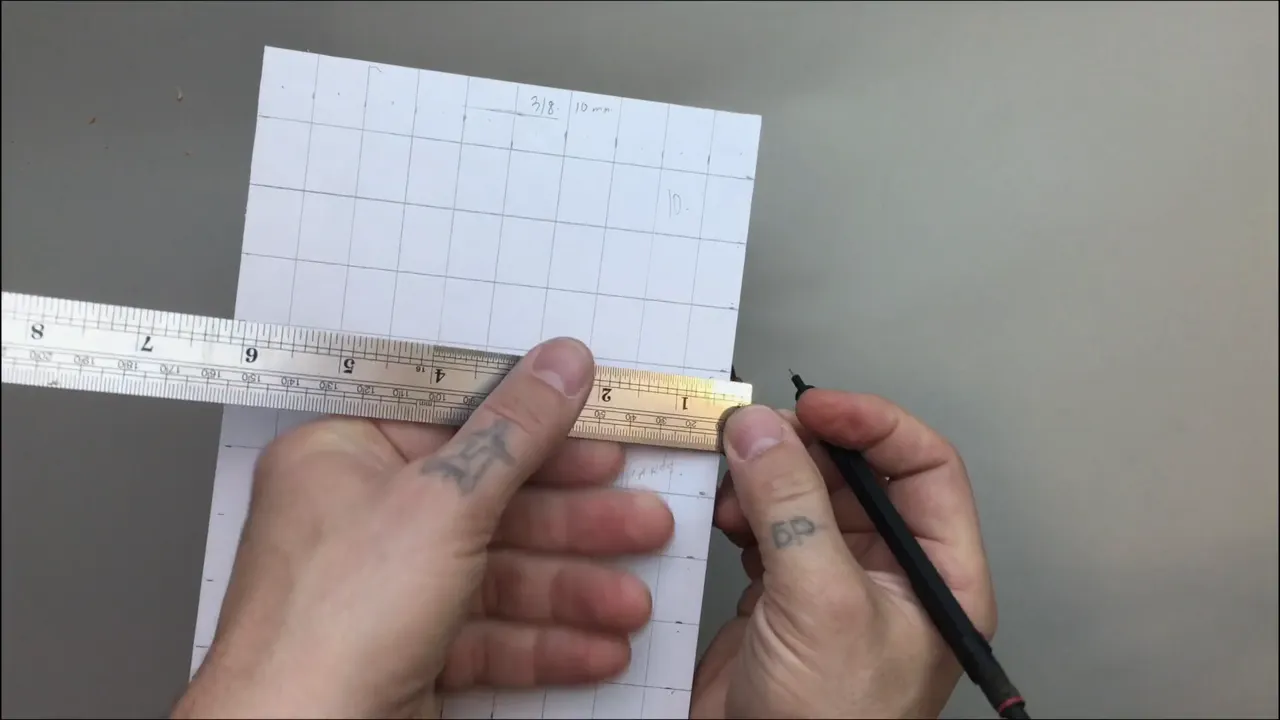
Ten parts across, ten parts down, and a symmetrical leaf stops being guesswork. I call it the ten parts division. The block is six inches by eight, the paper is already on it, and before any line of the leaf exists I have a grid of a hundred squares to hang that leaf on.

Have you ever drawn half an ornament you liked and then watched the other half come out wrong? Did the two sides refuse to match no matter how carefully you looked? Did you end up tracing somebody else's printout instead?
Then this is the workshop that fixes it. Almost mathematical, and so easy. Every point on the left half has a symmetrical twin waiting at one known address on the right, and the grid is what hands you that address.

What the grid does for a symmetrical leaf
- Divide the block ten ways vertically and ten ways horizontally, then write a figure on each one.
- Mark the boundary the design must not cross: 3/8 in (10 mm) at the top, about 1/8 in down the sides.
- Place the eyes and every main point first. Outlines come later.
- Each flow and each pipe runs to the centre, never off on its own.
- A Roman leaf is a Greek leaf with more pipes, more movements and more subdivisions on it.
- Black charcoal marks what sits low, white marks what sits above it. Neither is compulsory.
Why divide the block into ten parts?
Ten equal spaces each way, drawn straight onto the wood. I start with the middle lines, four inches and four inches on a six by eight block, then mark the ten divisions along a ruler and rule them across. Ten by ten, which comes out at a hundred squares.

Numbering comes next. It makes finding the right space far easier once I am drawing, and it means I can say the tip of that leaf sits on line 4, three quarters of the way up, rather than waving my hand at the board.

Every one of those spaces gets subdivided again in my head, roughly into ten. From those ten I count about six and mark it, and that becomes a marking point. Eyeballed, and near enough.

Paper on the wood, by the way, not a drawing pinned to the wall. Drawing the two symmetrical halves right on the block is good practice on its own.

Where do the boundary lines go?
Three eighths of an inch, 10 mm, in from the top, and about an eighth in from each side. Those are the lines I will not cross with the design, and the base gets the same three eighths as the top so the leaf sits inside a frame of clean wood.
Everything has a reason. A leaf that runs off the edge of the block leaves you nothing to hold when you start carving, and the volute at the bottom will crumble if it has no shoulder of basswood behind it.
Draw them before the leaf. A boundary added later is a wish, while one drawn first is a wall that a relief carver actually respects.

Which comes first, the outline or the eyes?
Eyes, most days. I start by establishing my eyes and the main points, working out how many eyes this leaf will carry based on the original Roman design, and only then do the outlines arrive around them.
Sometimes I start with the flow line instead. Both routes work. What does not work is starting with the pretty outer edge, because the outline is a consequence of where the eyes and the flows sit, and drawing it first means redrawing it three times.
Next comes the upper part, which I call the curl part. It curls forward, and it is the high point of the whole carving.

Then the flow lines. Here is the rule that makes a leaf read as one plant instead of a pile of shapes. They all have to go to the centre, to the same line, to the same movement. Pipe lines too, right to the middle. And the leaves overlap.
Why must every flow line reach the centre?
Unity. A leaf whose flows all arrive at one line reads as a single growing thing, and a leaf whose flows wander reads as a pile of separate shapes glued to a board. Everything in the flow lines has to go to the centre, or to the same line, to the same movement.
The pipes obey the same law. I establish the pipe lines next and they also run all the way to the centre, which is why a finished acanthus looks like water running downhill even though every part of it is standing still.
After that the leaves overlap. One passes under its neighbour, and that decision gets made here on paper rather than later with a gouge in your hand and no plan.
Test it with your eye before you commit. Stand the board up, step back a pace, and follow one flow line with a finger from its tip to the centre. If your finger stops or wanders, the drawing is telling you something a carved version will shout.

Why does this leaf carry so many pipes?
A pipe is the rolled tube of leaf that runs between two lobes, and Rome loved them. On this drawing I switch to a red pen purely for the pipes, so I can see how many there are and so can you.

Count them on any Roman capital you walk past. Lots of pipes. Then look at a Greek leaf from a few centuries earlier and count again, and the difference is most of what people mean when they say a carving looks more elaborate.
You just cannot go wrong with pipes on an acanthus leaf. Add another one and the leaf gets richer. Add six more and it still works, which is not true of almost any other decision in ornament.
The main leaf divisions split into three, and each small section subdivides into threes again. Threes inside threes, and the red pen keeps me honest about where each one lands.

How is a Roman acanthus different from a Greek one?
More of everything, and nothing else. When I say Roman style it cannot be one Roman style, because the Roman Empire ran for half a thousand years and developed its own art the whole way through.
Most architectural detail the Romans took from Greece, from Greek architects. Before Christ you cannot see a difference at all. A Roman leaf and a Greek leaf of that period look exactly the same, the same movements, straight copies. Later they beautified what was already standing, and kept at it for centuries.

| Feature | How the Greek leaf does it | What Rome did with it |
|---|---|---|
| Pipes | a modest count, easy to tally on one hand | many more, hence the red pen |
| Subdivisions | few, and the lobes stay simple | main divisions in three, then each small section split in threes again |
| The end spiral | straight, read from directly above | angled, so it leans and reads from one honest viewpoint |
| Movements | calmer, with fewer changes of direction | more of them, and in more places |
| Plant behind it | bear claw, the same weed in both designs | identical, only dressed differently |
One good thing about that empire. Whenever they conquered new areas they tried to learn something new, and they adapted it into their own culture. The leaf on my block is that habit, carved.

The plant never changed, though. A bear claw, the same weed growing round the Mediterranean, and the development of what carvers did with it is just fascinating. It decorated temples and official buildings across the ancient world, and the motif outlived every one of those governments. Beautiful.
How does an angled volute differ from a straight one?
A spiral that leans instead of facing you square on. A more ancient Greek volute reads straight up and down when you look at it. This one is tilted, which is more complicated than it sounds and worth the trouble.

Understand what it actually is before you draw it. This is not a full volute, it is a relief carving volute. It only makes sense viewed straight on, never from the side, and it still has to look three-dimensional from that one honest angle.

Mine has centres that stick out, and I think that adds beauty to the leaf. Thousands of carvers in stone and wood have done something similar over the centuries, so I claim nothing original here.

Archaeologists found simplified acanthus forms in Egypt as well, semi-symmetrical, about the same idea as what we are drawing now. The Greeks, the Romans and the Corinthians were the first to use this particular type.
Where does a symmetrical leaf like this actually get used?
Capitals, furniture, and anything that wants a still centre. You find symmetrical acanthus a lot of times on capitals, and it is really useful for furniture, which is the reason I teach this one before the flowing asymmetrical versions.
A symmetrical leaf sits calmly on a table leg, a chair crest or the centre of an apron because both halves balance. An asymmetrical leaf pulls the eye sideways, which is wonderful on a frieze and wrong in the middle of a drawer front.
The ancients used it the same way. Acanthus decorated temples and official buildings all over the Mediterranean, and Roman builders carried the motif into every province they reached.

Why mark the low spots with charcoal?
A pencil drawing says nothing about depth, and depth is what you are about to carve. I take two charcoal pencils, black and white, and shade the low areas black.

Around every pipe, black. This leaf has so many pipes that without it I lose track by the second hour. White goes on whatever sits above the black, and understand that white does not mean high in the absolute, it means higher than the black next to it.

That step is not necessary. You do not have to do it, and I do not do it every time. Nor is it there to make a prettier drawing. I do this for myself, so I can see which leaf passes under which before a single chip comes off.

Ready to draw this leaf alongside me instead of reading about it? Pick a course and start here, or take the whole school with Yearly Access and work through all sixteen workshops at your own bench.
Should you trace my drawing or draw your own?
Draw your own, and I say that knowing you can download mine. Gluing my printed sheet to the block is no big deal and plenty of students do it. But subdividing a board in ten and drawing the leaf yourself is a really good practice.
Your version will not match mine, and matching mine is not the goal. Get a close enough drawing. Get the main idea. That is sufficient, and the second leaf you draw will be better than the first for reasons no printout can teach you.
Notice how little I worry about accuracy while I draw. I am eyeballing everything, and most of that material is going to be gone anyway, so I redraw and refigure the movements as the wood comes down.
What happens to this drawing once you start carving?
Most of it disappears, and that is the plan. The pencil lines sit on the surface, and the surface is the first thing to go, so by the end of the second workshop half the leaf I drew today will be shavings on the floor.
So I redraw. I refigure the movements as the wood comes down, and the grid underneath stays true even when the lines on top of it are gone, because the grid is measured from the edges of the block rather than drawn on the part I am removing.
That is also why I do not fuss over a line being a millimetre out. Being close enough, visually, is genuinely the standard here. A drawing is a plan for removing wood, not a picture somebody is going to frame, and treating it as the second thing costs beginners whole evenings they could have spent sharpening instead.
Why does this school work like an apprenticeship?
Carving was actually learned this way for centuries, and the format still beats every alternative I have tried. I want this school to be an apprentice and a master, so you watch what I do and then you do it.
I do not want to entertain you. Three hundred years ago in any woodworking shop or carving shop, the master did the thing and the apprentice repeated it, and nobody sat back to enjoy the show.
So draw the grid. Number the lines. Put the eyes where the grid says they go, then bring the flow lines to the centre and let the leaves overlap. The carving in the next workshop is easier than what you just did.
How it's done
- Lay paper over the block and find the middle. Fix a sheet on the face of a six by eight block, then rule the two centre lines, four inches along and four inches down. Everything else on the board gets measured from those two.
- Divide each edge into ten. Mark ten equal spaces along a ruler and carry them across, then do the same the other way. A hundred squares, drawn in about four minutes, and almost mathematical once they are there.
- Write numbers on the lines before you draw anything. Put figures down one margin and along one edge. Then a leaf tip has an address you can repeat on the far side, instead of a position you judge by eye each time.
- Set the boundary the design may not cross. Three eighths of an inch, 10 mm, in from the top and from the base, and about an eighth from each side. Draw it now. A boundary added later gets crossed.
- Place the eyes, then the curl. Work out how many eyes the leaf carries and mark them. Then set the upper curl, which turns forward and becomes the high point of the finished carving. Outlines arrive around these, never before them.
- Run every flow line and pipe to the centre. Each flow has to arrive on one line and carry one movement, and the pipes follow suit. Decide here which leaf passes under which, because making that call later with a gouge in hand goes badly.
- Shade the low with black and the high with white. Two charcoal pencils. Black goes into anything that will sit low, including around every pipe, and white marks the parts that rise over it. Skip this step if you like. Think of it as a reading aid rather than a rule.
Frequently asked questions
How do you get both halves of an ornament to match?
Give yourself addresses. A grid of ten spaces each way turns every decision into a coordinate, so a point three quarters of the way across one square on the left goes three quarters across the matching square on the right. Eyes and hands drift, and a numbered grid does not.
How does a Roman acanthus differ from a Greek one?
Roman is Greek with more on it. Before Christ the two were indistinguishable, because Rome simply copied what Greek architects had built. Later Roman carvers added movements, extra subdivisions and many more pipes, and the plant behind both designs stayed exactly the same.
Which part of an acanthus leaf is called the pipe?
A pipe is the rolled tube of leaf running between two lobes, and Roman work carries a great many of them. Marking them in red while drawing is the only way I keep count, because once carving starts they are the first small feature to disappear.
What to carve next