
Alexander Grabovetskiy, woodcarver, School of Woodcarving · Published 2018
How do you draw flowers for a low relief carving?
Quick answer: Drawing flowers for low relief is a matter of movement rather than petals. In shallow furniture carving the final shapes get decided under the chisel, so the drawing sets the cluster, the direction and the centre of each flower, and leaves the detail to the gouge.
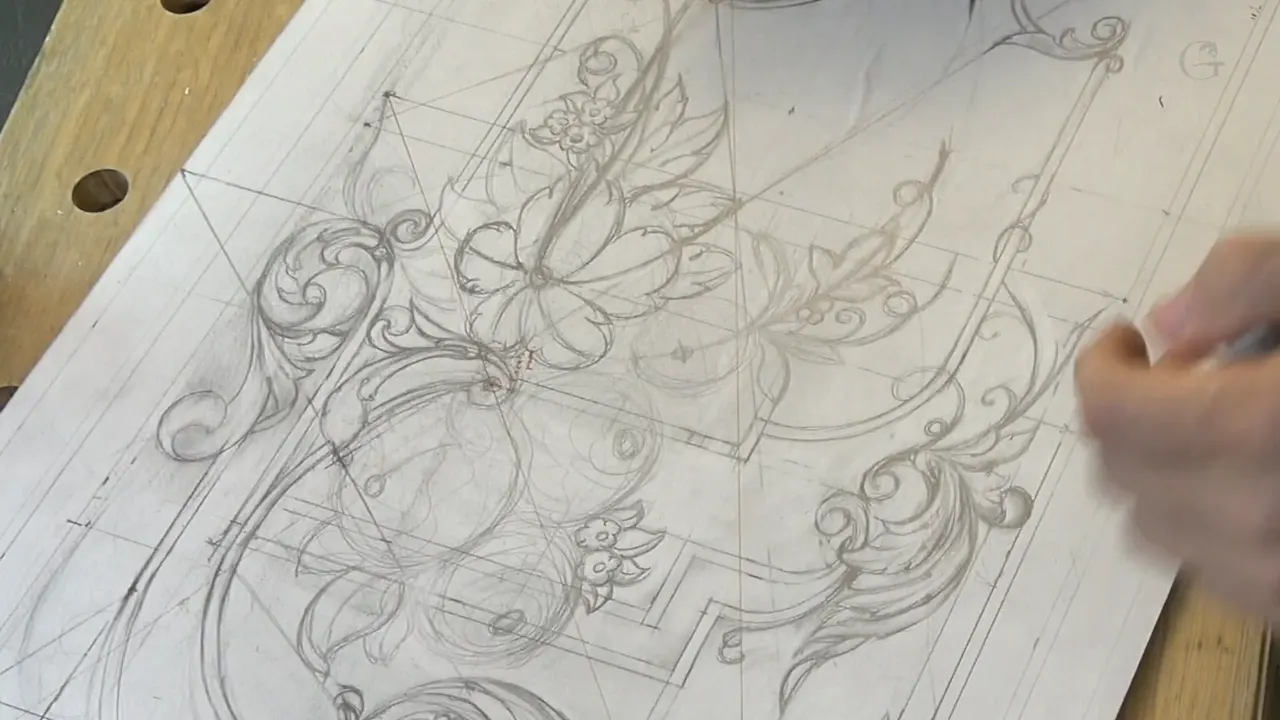
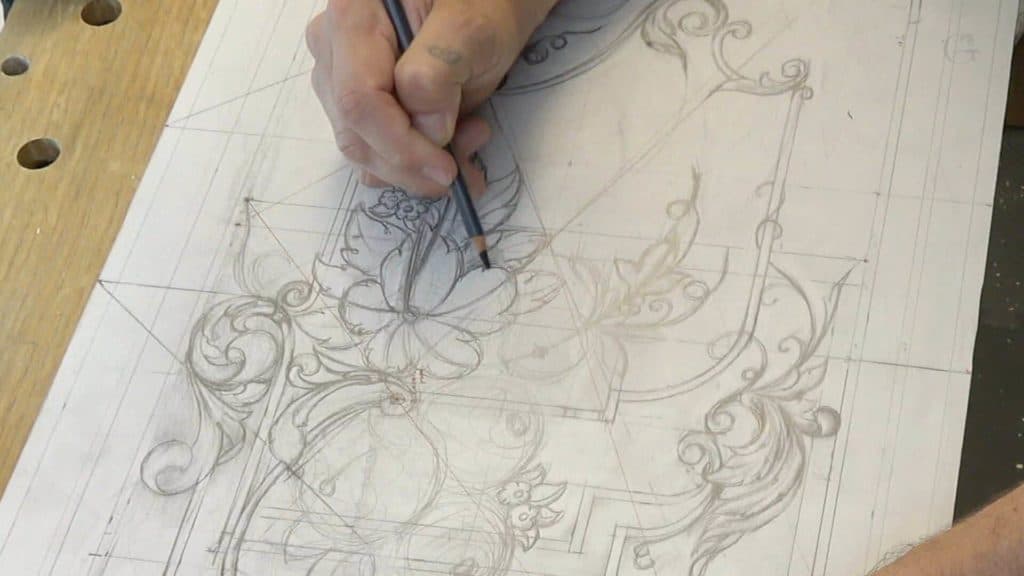
In a shallow carving you draw the movement, not the petals. This panel is shallow work, the furniture depth Chippendale and his contemporaries used, and at that depth the final shape of every flower gets settled under the chisel. So the pencil sets the cluster, the direction and the centre of each flower. The gouge decides the rest.
Ever drawn a flower in beautiful detail, started carving, and found there is simply no room for any of it? Or filled a space with blooms and ended up with wallpaper? Depth is the thing nobody warns you about, and it quietly changes what a drawing is even for.
Nearly five months went by between the previous lesson and this one. I moved, set up a new shop, and gave my attention to another project entirely. The board waited. Today, at last, the main focal point of the whole board gets its flowers.

What the pencil settles here, and what it leaves alone
- Which flowers sit together, and what shape the group makes.
- Direction. Every bloom takes its bearing from one main flow, which is what keeps a dozen separate shapes reading as a single gesture.
- A centre point per flower, set deliberately away from dead middle.
- Three flowers, three different sizes. Never two the same.
- Where the tiny filler flowers will close the gaps.
- Not the petals. Those come later, with a tool in my hand.
Why not draw the petals?
Depth decides it. My carving here will not be deep, which makes it shallow work in the furniture style that Chippendale and the other makers used. At a few millimetres of ground, a petal drawn full size on flat paper simply has nowhere to go.

What happens instead is that I settle the final movements while working on them, chisel already in the wood. Grain tells you things paper cannot. A petal that reads beautifully in pencil can sit right across a run of fibres that will tear.
Deep relief works the other way round and rewards a detailed drawing, because you have the depth to build what you promised. Know which one you are making before you sharpen a pencil. That single question changes how much drawing is worth doing.
What is a flower cluster?
Three or more blooms that read as one shape from across the room. Individually they are flowers. Together they are a mass with an outline, and it is the outline that has to work, because at six feet nobody is counting petals.

Mine draws a reversed S overall, and that is no accident. I tied the group to an invisible line already running through the panel, held it about the same distance from the centre all the way along, and picked a stopping point instead of letting it run out of energy.

Choosing where to stop is half of it. An S curve that runs to the edge of the board has been cut off by the frame. One that stops on its own terms looks intended, and the difference is a decision made in about four seconds.
Why must three flowers be three sizes?
Equal sizes cancel each other out. When I put three blooms close together I make the first the biggest, the second a little smaller, and the third smaller again, so the eye ranks them instantly and travels in an order I chose.

Give three flowers the same diameter and you have built a row of shirt buttons. Your eye cannot rank them, so the whole group registers as texture and gets passed over. This is the same law that made me shrink a curl in the lesson on how much detail is too much.
Variety of kind matters as much as variety of size. Beside the cluster I put a completely different type of flower, then repeated the original type smaller in another gap. Same family, different voices.
| The element | What the drawing fixes about it | Left to the tool | What goes wrong if you skip it |
|---|---|---|---|
| The cluster | Its outline and where it stops | Every petal edge | A mass with no shape at any distance |
| Each flower | One centre point, deliberately off middle | How deep the cup goes | Dead symmetry |
| The sizes | Big, then smaller, then smaller again | Nothing at all | A neat row of buttons |
| The leaves | Which direction they take from the main flow | Flip and curl | Foliage pointing nowhere in particular at all |
| The fillers | Only which gaps they close | All of it | Holes, or else holes filled with big noisy things |
Where should the centre of a flower sit?
Away from dead centre. Divide the line across a flower into roughly ten parts, and the golden point lands about six of those along. I eyeball it, and I said on the recording that it is not really critical, just approximately.

Each bloom in the cluster gets its own centre found that way, and because each sits at a different angle, each centre lands somewhere different. Nothing else stops a group of flowers reading as a printed repeat. Dead centres make dead flowers.

Six in ten is what placed the main focal point of the whole panel back in the lesson on root rectangles. One rule, applied at the scale of a board and again at the scale of a thumbnail.
Can you measure the golden point instead of guessing?
There is a tool for it and I keep one on the bench. It opens like a caliper and its linkage automatically divides any span into the six of ten proportion, so you set it across a line and read the point straight off.

I used it here purely to check my eye, and it landed on exactly the spot I had already marked. Honest use of the instrument looks like that. Eyeball first, verify second. With enough flowers behind you the eye stops needing the instrument.
Anybody selling you a golden ratio gauge as a substitute for judgement is selling a crutch. As a training wheel it earns its place, and that is a smaller claim.
What decides the direction of the leaves?
Every leaf takes its bearing from the main flow, although not all of them and not slavishly. I pick the principal line and most of the foliage follows it, which keeps a dozen separate shapes reading as one gesture.

Then I break it deliberately. One leaf gets a flip, showing its back. Another comes in as triple leaves of a completely different type. A third hangs down long, and a fourth goes right over the molding rather than stopping politely at it.
Berries go in where a cluster needs an ending. They are small, round and dense, and the eye treats them as punctuation. Gibbons used them the same way, in quantity, and his swags would fall apart without them.

What are filler flowers?
Really small, tiny flowers with tiny leaves, drawn in clusters to close a space that has nothing in it. I use them constantly, and you will find them all over period furniture once somebody points them out to you.

They solve the problem that ruins most amateur panels. An empty patch tempts you to put something important there, and something important in the wrong place is far worse than a gap. Fillers close the space without making a claim.
I switch pencils for them. The construction goes in with a 2H, hard and faint, and the fillers get a 4B so they read as foreground. Two pencil grades are doing the job of two depths, months before any wood is removed.

Which part makes it an acanthus flower?
Divide it into five and work outward from there. Those five are its main divisions, and everything else hangs off them. The long details climb straight from its middle so the bloom looks like it opened from inside, and that middle gets hollowed as a shallow bowl.

Then every petal gets subdivided, and so does every leaf around it, right down to the smallest. That subdivision is what makes it read as acanthus and not a generic bloom, and leaving the little ones plain is the commonest way to lose the effect.

Eyes go in last. The centre lines I drew to find the movements are for me only and will never be visible, which is worth saying plainly, because they look exactly like the lines that do get carved. Compare the finished shape against a Corinthian leaf and the relationship is obvious.
Why repeat a twist somewhere else?
A motif used once reads as an accident. I made a twist here, liked it, and then said out loud that since I have something like that I have to repeat it somewhere else, and the only spot I could find was across the panel. So across it went.

The repeat does not have to be the same size or the same prominence. A large twist answered by a small one is stronger than two matching twists, because the pair then has a hierarchy instead of a symmetry. Same principle as the flowers, running one scale down.
Those tiny details make the whole world of a difference, and they are the cheapest thing on the board. A rosette or a pair of berries costs you ten minutes with a pencil and changes how the eye moves for the next century.
The trick I use for uniting two areas is to start a leaf on one line and finish it on another. It begins by repeating the first line, ends by repeating the second, and the two parts of the panel are quietly tied together by a shape nobody reads as structural. Same idea as a festoon spanning two points on a frieze.
Does the drawing survive the chisel?
Partly, and I am honest about which parts. Twice in this session I say that once I start carving I will probably fix some of the movements, and that I expect things to change. A drawing is a plan, not a contract.

What survives is everything structural: outline of the group, direction of the flow, centre points, sizes. What changes is whatever the grain objects to, and it always objects to something, usually a thin element crossing the fibres.
Stopping when I do has the same reason behind it. I said I do not want to put too much of the details in, and the reason is that details drawn now get redrawn once the tools are out anyway. Work spent on them twice is work spent once too often.
Go through a museum collection of carved flower panels and ask yourself which passages were settled on paper and which were settled with a gouge. Whoever stood at that bench had the wood in front of them. The drawing did not.

When do you know it is working?
Shade it and look. I put tone underneath the shapes purely so the main idea reads at a glance, and it is the fastest check available. Without shading you are judging outlines; with it you are judging the thing a viewer will actually see.

One shape failed that check today. I looked at a long movement and said it just looks like a tail and it does not talk to me, so it came out and went back in closer to the line it should have followed. Same twist, better parent.

The whole panel now goes on to the carving stage, though the drawing is not finished and I will change things at the bench. The rest of the sequence sits in this design workshop, the next lesson is lesson thirteen, and the board itself is the ordinary lime I use for everything. If you want the whole method rather than one lesson of it, the school is where it lives.

A last word about the five month gap, since somebody always asks. Work stops. A shop gets moved, a commission jumps the queue, and a board sits under a sheet waiting for you. The panel did not get worse while it waited. Coming back to a drawing after months away is the strongest version of the step-back test there is, because nothing about the board is familiar any more and the faults have nowhere left to hide.
The counterweight at the bottom of this board came out of the previous lesson, and the way these flowers are subdivided is the same discipline you will meet in the modern acanthus course.
So: do you want flowers that survive the chisel, or flowers that only work on paper? Shall we carve?
How it's done
- Settle the depth first. Decide whether the piece is shallow furniture work or deep relief. That answer alone determines how much of the flower is worth drawing at all.
- Shape the cluster. Group three or more blooms and design the outline they make together. At six feet a viewer sees one mass, and the mass is what has to work.
- Choose a stopping point. Decide where the run of flowers ends rather than letting it fade out. A curve that reaches the frame has been cut off by it.
- Give three flowers three sizes. Biggest, smaller, smaller again. Equal diameters build a row of shirt buttons and the eye then treats the whole group as texture.
- Find each centre off dead middle. Divide the span of a bloom into ten and put its centre near six. A caliper that splits that proportion will check your eye in a second.
- Take leaf direction from the flow. Most foliage follows the principal line through the cluster, then one leaf flips, one hangs long, and one crosses the molding instead of stopping at it.
- Close the gaps with fillers. Tiny flowers and tiny leaves, drawn with a softer pencil so they read forward. They close a space without making any claim on attention.
Frequently asked questions
Why draw movement instead of petals?
Shallow work has no room to honour them. At furniture depth the final shape of every bloom gets settled with a chisel in the wood, where the grain gets a vote the paper never had.
What counts as low relief?
The shallow furniture depth Chippendale and his contemporaries used, measured in a few millimetres of ground. Deep relief rewards a detailed drawing; shallow work punishes one.
Should flowers in a group be the same size?
Never. Make one biggest, one smaller and one smaller again, so the eye ranks them instantly and travels in an order you chose rather than treating the group as texture.
What to carve next