

Alexander Grabovetskiy, woodcarver, School of Woodcarving · Published 2023
Does the thickness of a carving gouge matter?
Quick answer: Gouge thickness is the amount of steel that enters the wood on each pass, and near the finished depth it matters along with width. Heavy metal stresses the fibers until they split, leaving weak wood behind. Big gouges suit the first passes, while the last ones call for thinner steel.
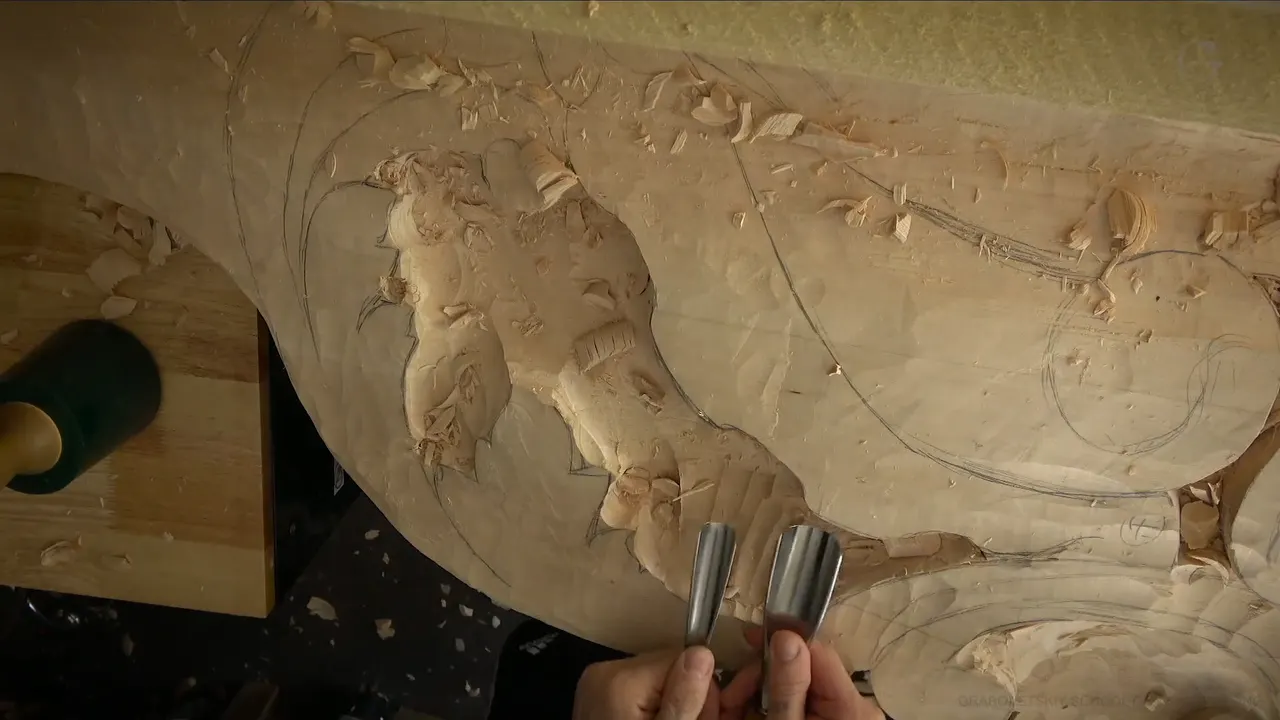
Gouge thickness is how much metal a gouge drives into the wood with every stroke, and close to the final depth it matters along with the width. Thick steel stresses the fibers and splits them. For the first passes I don't mind that. The last ones get thinner metal, and it doesn't have to be a smaller gouge.
Would you like to know why a deep hollow can crack right beside your gouge? Do you want to see which gouges I reach for once the hollow is almost as deep as it will go? Would it help to see me make a mistake? Then pay attention to the metal itself, and a little less to the number stamped on it.
A gouge usually carries two numbers, one for the sweep and one for the width, and what those numbers mean is the right place to start. Neither one tells you how thick the steel is. On this board, one relief panel of a whole room of architectural carving in the style of Venice in the 1400s, I held two gouges up side by side to show you why that matters once you are deep in the wood. You will come away knowing when heavy steel earns its place and when it begins to damage the wood.

Six things to carry to your bench
Big, heavy gouges are fine for the first passes, while most of the waste is still coming out of the hollow.
As a hollow gets deep, change to thinner steel, even when the gouge stays just as wide.
Thick metal splits fibers, and the wood it marks goes weak.
Where the grain runs the wrong way, take a few strokes and lift, so the chips break out before the inside can break.
Get near a line with a #9 or #11 first, and chop straight down only after that, and lightly.
Relieve each small triangle before you chop around it.
Skip that once, the way I did in this lesson, and the wood can break underneath.

Why does a thick gouge split the fibers?
Thick steel digging in means more metal going into the wood with every stroke, and the fibers take that as stress. When a deep hollow begins, I use bigger gouges on purpose. Closer to the final depth I switch to smaller ones, and width is only half the reason.
Hold two gouges together and look. Width is the difference you notice first. Thickness is the one that is easy to miss, and it is why I held two of mine up on camera in this lesson.
The thicker gouge puts a lot more stress into the fibers as you dig. You can see it as marks in the wood, and where those marks are, the wood becomes really weak. What you are really doing is splitting the fibers apart. Early on, that's okay. At the bottom it isn't, because the wood you leave there stays in the carving.
My teacher taught me to think like a tool. He meant which tool you are going to use, and down in a hollow that answer keeps changing the deeper you go.


How can you see stress in the wood?
Small marks show up in the wood, little splits running along the fibers. On camera I said, take a look right here. I started to show it closer, then told you that's okay, I hope you understand, I don't want to stop.
Those marks are the stress itself. The wood around them gets really weak, and that is why I leave heavy steel behind before I reach the bottom. If you want the science of how wood holds together, the US Forest Products Laboratory puts it in its Wood Handbook.
Things still break at this stage. I broke off the end of one element in this lesson, a small piece of the design, without touching my pencil mark. I still had plenty of material there, so I wouldn't call it a mistake.
That spare wood is there on purpose. Along one edge I stopped short, because I may want a chamfer look there, and I said I can always go to the edge later with no problem. In some spots I went almost all the way down to the first layer, which also answers why I glued up so much wood.

When is a big heavy gouge still the right tool?
At the start, while the bulk of the wood is still coming out. One deep spot got a #9 at 35 mm, which I first called an inch and a quarter and then corrected on camera, since it is closer to 1 3/8 inches. Later, where there was a lot of material, I said so, picked up the same 35 mm, and just kept digging in.
The biggest gouge in this lesson was a #7 at 80 mm, about 3 1/8 inches. I chopped around the acanthus heads with it, and almost every head took it perfectly, because I thought about that gouge when I was designing them. One chop, boom, and that head was pretty much done. You can carve a head like that without the right gouge. It just takes much longer.
Even with the big tools I stopped short in one place, because going all the way to that acanthus would have put a lot of stress into that wood. Parts of this hollow get deeper later, once the inside details come.
Another way down is to take plugs out. By the shell I chopped straight down, rotated the gouge and hooked the plug out, again and again, and with that you can go whatever depth you need. At about an inch I stopped. Then I moved on to another technique and cleaned up the walls.
In one spot I was about 1 1/4 inches deep at the lowest part, 32 mm. Around the shell I planned 32 to 38 mm, up to 1 1/2 inches. I want that depth for the shadow, because this panel goes inside a room, and in the evening those hollows will throw a lot of it.


What does thinner steel change down deep?
The fibers take less stress, and I put that plainly on camera. To get to the final destination, it is better to use not necessarily a smaller gouge, but thinner metal. A big gouge with thin metal is better, because the fibers don't take as much stress.
Thin steel still digs, and it still leaves some stress behind, just less of it. Over the lesson my #9s came in several widths, 35 mm (1 3/8 in), 20 mm (3/4 in), 16 mm (5/8 in), about 14 mm (9/16 in), 10 mm (3/8 in) and a quarter inch (6 mm). The small ones came out for the tight spots near my lines.

One spot had to go deeper, and straight cuts down there would stress too many fibers on both sides, so I said a spoon gouge or a long bend would do. I tried a #11 long bend, 13 mm across, and then said a short bend would probably suit that spot better, or attacking from the opposite direction. When it was deep enough I stopped. I did not want to go deeper than that. A flatter #3 with a medium bend and a number two and a half cleaned up after it. And yes, I love number 11s, as I said a little later.
The stamp on a gouge gives you its curve and its width. How thick the metal runs is a third thing, and you see it best the way I showed it, with two tools held together.

Why lift the gouge after a few strokes?
Lifting breaks the loose particles out before the wood can break on the inside. At one point I was working against the grain on one side, which is not the best idea, since you are supposed to attack from the other side. What I did was take a few strokes in, raise the gouge, and break those particles out.
I was limited there. I preferred not to rotate the panel, and I don't like to swap my hands, because it still isn't comfortable for me. I am swapping hands, don't get me wrong, but I'd rather not if I don't have to.
Late in the lesson I did the opposite on purpose. One side of a gouge carves with the grain while the other side works against it, so I carved from one side, then switched sides to finish the same pass. You get a clean surface on both sides that way.

Why not chop straight down to the line?
Chopping straight down right at the line strains the wood on both sides of the gouge. I could have done it that way here, and I said so. It is always better to go in first with a gouge like a #9 or a #11, get near the line, and chop after that.
Once I did it anyway, outlining with a #2 1/2 that fit the line perfectly, and said out loud that I wasn't supposed to, because I was putting too much stress on both sides. That chop was only an indication, a line to see for now. So I didn't hit it hard.

Beside a line I wanted to keep, I slowed right down. Near the shell line I was barely removing any material, because I didn't want to make the mistake, and I said I was breaking the rule again by coming from the wrong side. So I changed position and attacked from the other side, going inward.
For one wall I needed a straighter edge than a #3 gives. I took a big 80 mm #1 chisel, about 3 1/8 inches wide, with a single bevel, and chopped most of that wall with it for quick results. Then I followed with a different tool. The furniture panel course has a whole lesson on why a stab at the outline does damage.

Six moments from this lesson fit on one small table.
| Moment | Move | Risk | Reason |
|---|---|---|---|
| First deep passes | Big gouges take most of the waste | Split fibers | I said that is okay here |
| Near final depth | Thinner metal, not always a smaller gouge | Weak wood | Stress marks stay in the wood |
| Working against grain | A few strokes in, then I lift | Inside breaks | I break the particles out first |
| Nearing a line | A number nine or eleven goes first | Stressed sides | Chopping straight down strains both sides |
| Small triangle corners | Relieve the waste there before chopping round | Breaks underneath | It broke once when I rushed |
| Marking a line | Light taps give me only an indication | Excess stress | That is why I tapped lightly |

Where do the small triangles come in?
In a corner, the wood between two lines makes a small triangle, and it needs relieving before you chop around the detail. I did it right several times in this lesson. Once I didn't.
I rushed. I was outlining with a #3, 16 mm or 5/8 inch, and the wood broke underneath, because I had not relieved the triangle. I had lots of wood to spare there, so it cost me nothing that day. In general, though, that would be a big mistake once I was working on details.
Later in the same part I found a tiny triangle and relieved it first with a 10 mm #9, 3/8 inch. Another corner I didn't relieve quite enough, and I said so. The relief cuts for triangles like these get more time in lesson 3.

Does gouge thickness have anything to do with the bevel?
Here I compare the metal, and that's all. Bevel length is a different question, and this lesson leaves it alone. How long a bevel should run has its own lesson in the sharpening course, and the bevel for hardwood has another in the tools course.
What happens after the roughing is done?
I get tired. Working on big shapes all the time wears you out, and I said so near the end of this lesson. A good idea then is to walk away for a while and do something else, once the main idea is on the board.
What I carved in this lesson is not the final shape, and I said so more than once. What you see is an indication of the overall movements, preliminary, with the final passes still to come, which is why a lot of mess inside a hollow is okay at this stage.
For roughing out, what I had by then was enough. Next time I start on the details right in the middle and work outward, which means the shell in lesson 5. Lesson 6 carves a row of beads. Late in this lesson I said the details were coming soon and would be more exciting. If you want to see Venetian work of that century for yourself, the Ca' d'Oro is a good place to start.

Would you like to watch this room come off the bench, one lesson at a time? Every workshop of the Venice room is inside the tuition, along with the sharpening course and the tools course.
Never held a gouge? Start with first cuts for beginners, then come back to this board. The course page lists all twelve workshops of this first part, and part 2 carries the room on from workshop 13. Or just pick something to carve.
How it's done
- Clear the bulk first. Take the waste down with your widest, heaviest gouges while the surface is still rough.
- Hold back near the bottom. Leave the last stretch of each hollow for later, so the strain stays out of wood you plan to keep.
- Compare two tools. Set two gouges next to each other and see which one carries less metal.
- Finish with the thinner one. Use it for the last passes, even if it is every bit as wide.
- Approach, then chop. Remove wood near the line with a #9 or #11 before any vertical chop goes onto it. Tap lightly where you only want an indication.
- Relieve every corner. Take the little triangle of waste out before you work around a detail.
- Lift often. On contrary grain, pull the tool out every few strokes.
Frequently asked questions
Can a thin gouge still split the wood?
Thin steel still digs, and it still puts some strain into the fibers, though not as much. I said as much on camera. Save it for the final passes and let the heavy tools carry the waste.
How deep do you go before changing to thinner metal?
Close to the final depth is where I change, and the lesson sets no fixed number for the switch. On this panel one hollow bottomed out near 32 mm, and the area around the shell was planned for up to 38 mm, about an inch and a half.
What is a long bend gouge?
A long bend has a gentle curve in its shank, and the bend starts almost at the handle. I took a #11 long bend about half an inch wide, 13 mm, into one deep spot, then said a short bend might suit that spot better, or coming at it from the opposite direction.
What to carve next