

Alexander Grabovetskiy, woodcarver, School of Woodcarving · Published 2023
How do you cut out a carving outline with a jigsaw?
Quick answer: Jigsawing a carving's outline is following the paper line in a set order. A preliminary cut opens the waste, the long straight runs go next, and the notches and points usually come last, taken from both sides, and the blade never twists, which keeps the thin tips on the board.
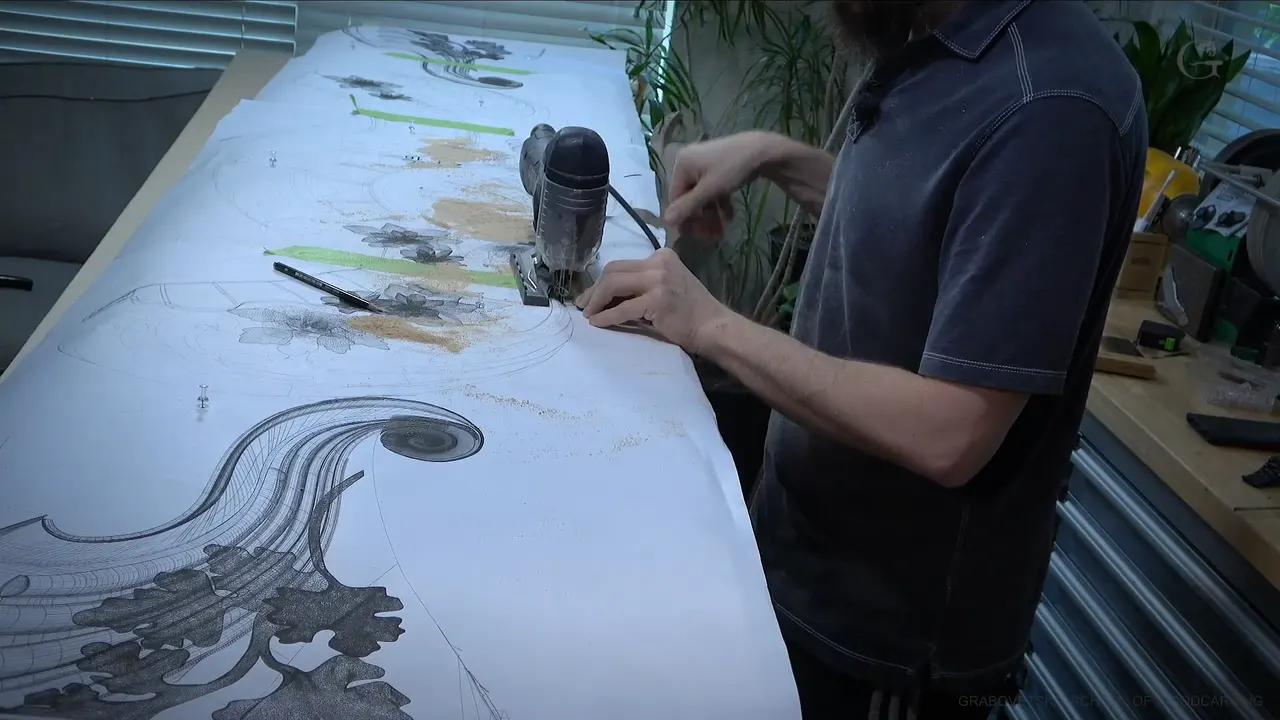
Cutting out a carving outline on a jigsaw is a job of order, and the order decides whether the thin points of the design survive. I open the waste with a preliminary cut, run the long straight stretches next, and usually leave the notches and points for last, coming back to them from another side. On my Venice panel the board under the blade was a single layer about two inches thick (50 mm) and ten feet long, around 300 cm.
Would you like every point on your outline to come off the saw in one piece? Would it help to know where the first cut goes in? Do you want an edge a square can check without finding a gap? Then saw in order, the same order I used on the first board of a whole Venetian room.
A jigsaw looks like the easy part of carving. Mostly it is. This board, though, belongs to a client's commission, a whole room of architectural carving in the style of mid 15th century Venice, and I expect the job to take at least three months, so the outline has to be right the first time. Saw in the order I show here and your gouge starts on an outline with every point still on it.

Seven rules I keep when a jigsaw follows a carving outline
Start at a weak point on the middle line.
Make a preliminary cut in the middle of the waste to spare the blade a hard turn.
Carry each straight stretch to its end before any detail.
At a notch, saw in from one side, then the other, and lift the leftover out.
Go up to a point and around it, and come back toward the inside later.
Ease the saw back a little when it jumps.
Hold a square to the sawn face, and where the printout shows two lines, saw on one.

Should you knife the outline first or saw straight to the line?
Both are fair ways to begin, and I named both on camera before I started sawing. I could cut the whole outline with a knife and mark it in pencil, or go right to the line with the jigsaw. On this board I went straight to the line, with the paper pattern still held down by push pins and tape, and the paper came off only when the layer was done. When I started, the saw had the wrong blade in it, so that had to be changed before the first cut.
Any jigsaw will work, and I said that too. Mine is a Festool, because it gives me a clean 90 degree cut, and I checked the blade for square before I went near the line. On work that ends up all hand carved I still reach for a jigsaw or a scroll saw sometimes. Which blade to fit and how to set the saw are written up on the course page for these twelve workshops, so I won't repeat them here.
The board has to sit still, with room under it for the blade. Flat on the bench and unclamped, it moved easily, and that is not the right way to work, as I said at the time. Four bench cookies from Rockler fixed it. They lift the board high enough for the blade to travel underneath, and the rest of what belongs on a carver's bench is in the tools course.

Where does the first cut go in?
At a weak point. On my board that was a narrow spot on the middle line of the pattern. Past that spot the wood spreads out and gets thick, and the middle line gives me a place where I can always split the waste off later, so that is where the saw goes in first.
Before that cut I checked my measurements again, then once more. I even said sorry to the camera for how long it took, but the first measurements always matter most, because a millimeter or two wrong at the start adds up later. While pinning the paper I got scared for one second that I had placed it wrong, and I hadn't. After all that checking I announced I was ready to carve, then caught myself. Make my cut, I meant.

What does a preliminary cut do for the blade?
A preliminary cut opens up the waste, and after that the blade never has to swing through a hard turn to reach the line. I made mine right in the middle, then attacked the line. Later I could saw straight over to the middle, because the preliminary cut was already there to meet me.
Two things I wanted to spare. I did not want to burn my blade, and I did not want to make too many turns. The saw was loud, and I said sorry for the noise, but that's the way to do it anyway.

Can a jigsaw get into a tight notch?
It can, if you come at it twice. One way is to aim straight at the notch and push in. The wiser way, and the one I took, is to saw into it from one direction, then from the other, and lift out whatever is left between the two cuts.
Even then, the blade has a tendency to jump in a spot like that, and you can watch it happen in the video. It was fine. I just wanted the job done quickly.
After that the rule is short. Cut to it, go back, cut back, and so on. I told the camera it is not that complicated, and it isn't. I said I would not explain every step, because every detail after that works the same way.

What saves a thin point from snapping off?
Saw up to the point, steer past it, and come back for it later from the inside. When my blade reached the tip of one detail, I said out loud that I was not going to destroy my point, and I steered around it. The final shape of that tip waited for a later cut.
Twisting is what kills a blade. I don't twist the saw to force a curve around a detail. I pull it back a touch, let the cut bend in a gradual movement, and when the blade starts to jump I ease it off slightly and carry on.
I proved that on camera. I tried a different blade in a turn and killed it in the first layer, which was only about two inches thick then, so it went straight in the bin. A gouge is different. It gets sharpened, and that has its own course.

One spot stopped me cold. A really small, tiny detail sat right on the line, and I could not remember what it was meant to be. I worked around it very carefully and left it for later.
Sometimes a small chunk stays behind. I turn the saw the opposite way and take it off right then. The rest of that stretch was plain sawing, and I said I hoped I would not have to stop again.
The whole order fits on one small table.
| Spot | Move | Risk | Reason |
|---|---|---|---|
| At the start | Go in where the waste is thin | Thin wood | Waste splits along the middle line |
| Middle of waste | Saw a preliminary cut before the line | Blade burn | Fewer turns, and no burnt blade |
| Into a notch | Cut from one side, then the other | Blade jump | The blade tends to jump there |
| Near a point | Go around it and return from inside | Snapped tip | The tip stays whole for later |
| Long straight stretches | Run them all first, before any detail | Harder work | Easier, I said, not always better |
| Double printed line | Choose one line, keep to its left | Lost space | That white space meets a corbel |

Why saw the straight lines before the details?
Straight runs go first. My habit is to carry the cut all the way along whatever straight line I have, and only then work on the details. I was not sure it is better, and I said so. Much easier, though.
The same thinking works on any fussy shape. Make a cut around it first, then go to it, and the blade stays off the parts you want to keep.

Leaves come last of all. The edges of my future leaves were wavy on the paper, and I did not follow the waves with the saw. I made straight cuts that just hit the corners, because those leaves will run uphill and downhill once they are carved, and I can work their details in later.
A tight corner gets two cuts. I saw toward the corner, then attack it from the opposite side and clean up what is left.

Which line do you saw when the printout shows two?
Pick one and stay with it. My printout had a double line in one place, and I told the camera not to pay attention to it and just cut on one of them. I stopped the saw there on purpose, only to explain it.
I kept to the left side of the line there, for a reason that sits further along in the job. That spot will meet a corbel, a bracket that stands out from the wall, so I dug the blade inside the detail to keep the white space and give the connection a smooth transition.
The corbel isn't carved yet. I kept the sawn paper, though, because the same outline can serve as its pattern.

Is the sawn face really square?
Hold a square against the sawn face and look for a gap. The camera could not show mine, so you will have to take my word that it was right on the money. After the first piece came off I checked again, and there was not even a gap, not at all, which made me really, really happy.

A square cut is what lets the saw go right to the line. And even a good cut off a fast blade is rough. The progressive blade I used did not leave a super clean face, and I did not worry about it, because most of that edge gets carved away anyway. Near the end I checked once more and said it didn't matter where you look, it was perfect.
At the end of a layer I go round once more and look for any spot the blade missed. If I missed one, I really don't worry about it. Anything the saw leaves standing, a number one chisel or even a knife takes off right away.

What keeps ten feet of board steady under the saw?
Keep moving the support, and keep moving yourself. Once the first piece of waste came off, one side of my board got much heavier, so I moved the cookies to give it good support before the next cut.
My bench that day was a tool chest with a wood top on wheels. Instead of stretching across ten feet of board, I rolled one end of it a little to see the line better, and I walked around to saw toward myself or away from myself. At one point I was about to block your view, so the other camera took over for a stretch.

The guard got in my way too, so I raised it. A vacuum or a dust collector is the right tool for the dust, and I left that for later, because I'd rather not make that noise on camera.

What happens to the outline after the saw?
The outline becomes the map for everything a gouge does next. When the first layer was done I took the paper off, and off camera I glued on the next layers, each one sawn the same way. It was exactly the same operation, just the jigsawing, so I did not repeat it on camera. The stack was about six inches thick (150 mm) when I finally picked up a gouge, and near the ceiling it will reach about nine inches (230 mm), maybe a little more.
The saw is done with the board at that point. From there on it is all hand carving, starting with one of my biggest gouges, and the next lesson picks up where this one stops. Workshops 13 through 25 are in the second part of the Venice room.

Would you like to watch the rest of this room come off the bench, one workshop at a time? Every workshop of the Venice room, from this first layer on, is inside the tuition, beside the other courses.
Never held a gouge? Start with first cuts for beginners or the kitchen cutting board, then come back to this board. If you would rather draw your own outlines than print mine, that is Principles of Design, and the furniture panel course starts with the design of a panel. The questions I get asked most sit in one place, or you can just pick something to carve.
How it's done
- Seat the stock. Pin and tape the printout down, and set bench cookies under the board to give the blade room below it.
- Check the blade. Make sure it stands at 90 degrees before the first cut.
- Open a weak spot. Begin at the narrow part of the waste, on the middle line, and saw a first cut into it away from the line.
- Run the long lines. Carry every straight stretch to its end. Wavy leaf edges get plain chords that meet their corners.
- Take notches in two bites. Saw in from one flank, finish from the opposite flank, and remove what stays.
- Swing past each tip. Saw up to each point, go round it, and return from the inside once the waste has gone.
- Test the face. Hold the square to the sawn edge, then lift the paper off and keep it.
Frequently asked questions
Do you need a Festool jigsaw for carving blanks?
Any jigsaw will do the job, and I said as much before my first cut on this board. I like my Festool for its clean 90 degree cut, but what keeps the points of an outline whole is the order of the cuts, and that costs nothing at all.
Should the paper pattern stay on while you saw?
Leave it on and follow its printed line. Mine stayed down with push pins and a few strips of tape until the whole layer was sawn. Afterwards I peeled it off and kept it, since that outline will become the pattern for a corbel later in the job.
Why does a jigsaw blade jump in a tight spot?
Mine jumped at a notch in this lesson, which is the kind of place where it tends to happen. When it starts, back the saw out a hair instead of forcing it, and take the notch in two cuts, one from each side, with the leftover lifted out.
What to carve next