
Alexander Grabovetskiy, woodcarver, School of Woodcarving · Published 2021
How do you carve an oval flower rosette in the Venetian style?
Quick answer: A Venetian flowers rosette is an oval panel carrying a raised bouquet inside a moulded rim. Four button flowers, bigger open blooms, a couple of buds and leaves sit on a punched ground. Draw the oval with string and nails, rough it with a wide gouge, then build the whole thing out of shadow.
Nobody in 1500 owned a computer, and their ovals came out right anyway. Twine, three nails, a pencil. That is the whole machine.
Have you ever drawn an oval freehand and known, before you finished it, that the thing was lopsided? Have you then spent an hour trying to fix it with an eraser? Put the eraser down.

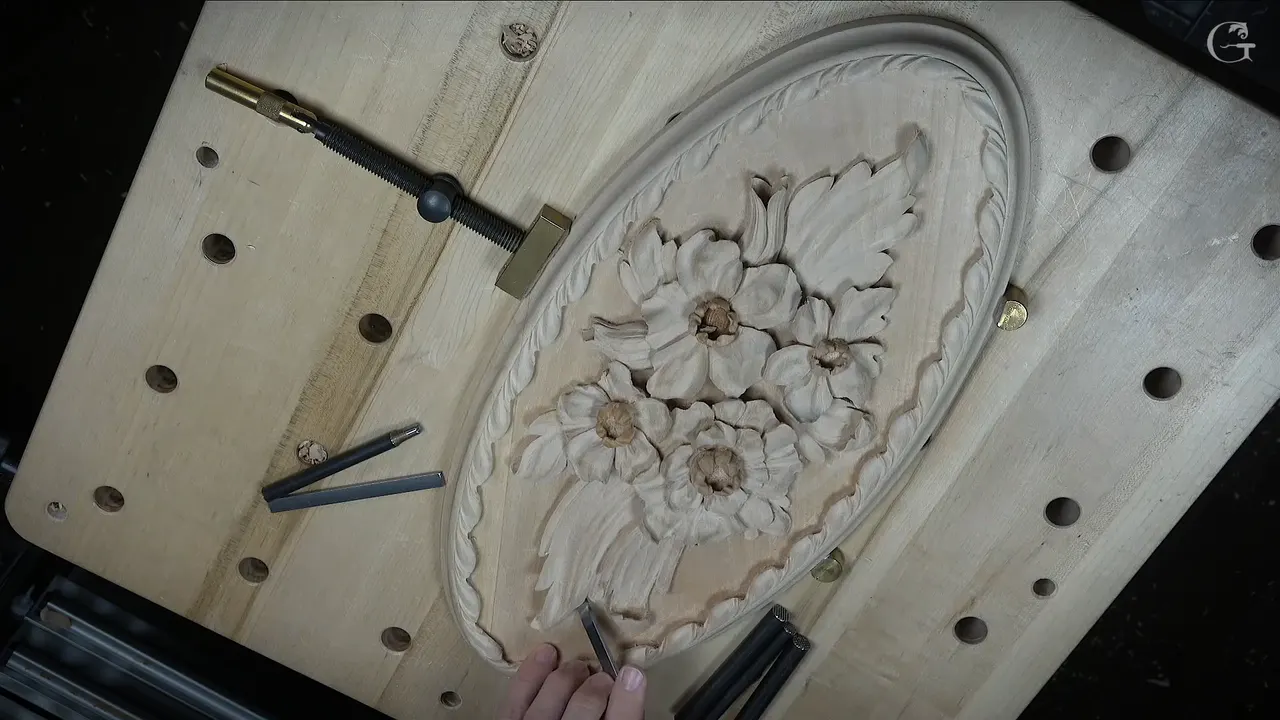
What you see here is one panel out of my Venice Room. Two flat spots inside that room needed an inlay, so I carved a pair of them, and I filmed this one because it is kind of nice, with flowers and small details going on.
What is a Venetian flowers rosette?
This piece is an oval panel with a raised bouquet carved inside a moulded rim. Mine holds four button flowers, bigger open blooms, a couple of buds and leaves, all sitting on a punched ground, in the style of late fifteenth century Venice.
Key takeaways
- String and three nails give you the oval. Egyptians used it, and in my opinion it is still one of the best ways.
- Sketch every flower as an oval, never a circle. Sloping them into three dimensions is what makes them read round.
- Rough with a big tool. A 20 mm number 9, cutting across the grain, a few millimetres off your line.
- Drop the ground about twelve millimetres below the flowers first. By the end it sits about an inch down.
- No two petals repeat. Concave, convex, concave, and different again on the next flower.
- Settle the light source early. That one decision tells you which petal hides beneath which.
- Punch the ground and the flower middles. I have used the same punch before.

How do you draw a true oval without a computer?
String, three small nails and a pencil. Find your centre lines first. Then one nail goes on a centre line, and a strip of paper swung from it marks where the other two go.
My own sketch came off an iPad, freehand, and the oval in it was not true. I needed a better one, so I reached for twine.

Finding the centre needs nothing clever. Set a pair of calipers by eye to roughly half the distance. Make one dot, go from the opposite side for another dot, and eyeball the line between those two dots. Repeat at ninety degrees with a square, or with a sheet of printer paper if you have no square, since printer paper is square enough for this.
That first nail goes in about an eighth of an inch clear of where the moulding will land. Loop the twine round all three, pull that one out again, take a pencil, and go round. Mine took three attempts. The first ran wide, the second too narrow, and I marked the keeper in red.
Perfect? No. Perfect enough, and perfect enough is what the old work was.

Why draw the flowers as ovals rather than circles?
Every flower on my drawing is an oval, and not one of them stays that way. Once you slope a flower downhill in all directions, the oval shortens as your eye travels over it, and what your eye receives is a circle.

Those ovals on my drawing are no mistake. They are not there because the frame is an oval, either. The slope is why I drew them that way.
That rule reaches past flowers, into any three dimensional ornament you lay out flat. Plan the shape you want to SEE, then work backwards to the shape you have to DRAW.

What stock, and what stops it moving?
Eight quarter stock, near enough an inch and seven eighths. Mine came from offcuts left over from the same room, and since the piece finishes under grey paint, the grain direction hardly mattered.
Holding is bronze bench dogs. Veritas, and they want 19 mm holes rather than the 20 mm ones on a Festool bench, so measure before you buy. I glued leather onto every face that touches wood, because bare brass marks an edge, and I keep the pressure light, since even with leather you can still damage it.
The rim is a Roman ogee, and I cut it with a router. Yes, that is cheating. This room had to be finished, and I could not afford to lose time anymore.

Solid block, or flowers applied to a backing?
Both are legitimate, and I nearly went the other way. The other route is to scroll each flower out on its own, carve it, glue the lot down onto plywood or MDF, and run a separate oval moulding round the outside. An applied rosette.

Both ways look good. When I started this panel on camera, I still had not made up my mind.
Solid won for one reason. On camera you can watch everything that happens between a flat board and a finished panel, and an applied piece hides most of it. One 8/4 board, and the whole bouquet was dug from the middle of that plank. If you want to see where this thing ends up, it goes into the Venice Room, and there are two of them, mirrored, one for either side of the same wall.
Which tools take the waste off?
Start bigger than feels comfortable. A 20 mm number 9 makes the start much quicker, and the small ones come out later.
| Tool | What it does on this panel | Size | Why I reach for it |
|---|---|---|---|
| Number 9 | Straight down cuts right round the whole drawn design | 20 mm | Stay three to five millimetres outside your line |
| Number 9 | The tighter curves the big sweep cannot follow | 10 mm | Three eighths of an inch, near enough |
| Number 3 | Straight down again, creeping closer to the boundary line | 20 mm | Approximate is fine at this stage |
| Number 11 | Separations, deep shadow and most undercuts on the piece | 0.5 to 6 mm | Almost every shadow here came off one of these |
| Spoon gouge | Hollows that a straight tool simply cannot reach | 10 mm | A number 7 does the job nicely |
Cut across the grain rather than along it wherever you can. Best practice, not a law. Force it along the grain and the piece can break.

What is a number 17, and why is it not a V tool?
A number 17 looks like a V tool and is not one. The bottom of it carries about a sixteenth of an inch of roundness, so what it leaves has a curve at the base instead of a crease.

The wings still run out to the sides the way a V tool's do. All the value sits right there. One tool makes the concave and reaches left and right, so I do not have to switch tools.
The ones on my bench are Swiss made, and three sizes did this panel, 20 mm and 6 mm and 3 mm. Only three sizes reach the United States as far as I know. It's a good tool. The tools course goes through the numbering properly.
It is good for the undercut too. It slides under a leaf edge and leaves the transition clean, with no hard line to chase out afterwards. I still reached for number 11s on most of this piece, because a veiner feels closer to the century I am copying.
What does it mean when the wood feels spongy?
Your tool is blunt. Sometimes the wood plays a part, but most likely it is the edge.
When the surface mushes under the edge instead of slicing, stop and sharpen. My edge went mushy on this panel too, so I sharpened it a little, and it was much better. How I bring an edge back is a whole course on sharpening.

How far down does the background go?
About one inch at the deepest spot, and I got there in steps. My first lowering left about half an inch below the flower tops, and about a quarter inch at their edges.
Clear the bulk using something wide. I reached for a three inch gouge on the open areas, purely because I had no wish to spend too much time on waste removal, then tidied with a number 7 and a number 5.
You will lose your pencil lines doing this. I lost most of mine. Keep the printout beside you and draw them again, and in the case of flowers nothing has to land back in exactly the same place.

Why should no two petals match?
Repeat a petal and it stops looking natural. Concave, then convex, then concave again, and the next flower gets a different sequence entirely.
Some petals climb. Others fall. Near the middle every one of them drops away, because that is what a real bloom does, and the outer edges wander instead of running true. Once you get a grasp of it, none of it is a problem.

What decides which petal hides under which?
The light. Settle where it falls first, and the answer picks itself.
An open V notch between two petals never looks as nice. One petal has to pass beneath the other. Which one? Whichever throws the shadow you want, given that my panel hangs near shoulder height with the light coming from above, and gets looked at in the evening with the lamps on. Work out where the dark falls, and you know which petal goes under.

What goes in the middle of the small flowers?
A dome, like a button, sunk in its own hollow. Grooves run inward around it, cut with a gouge barely a millimetre across.

Smaller than a sixteenth of an inch, that tool. On camera the grooves look enormous and in the hand they are nothing at all. They give the flower a more real look.

Then the punch. Texture inside each middle, texture across the ground, and the ornament suddenly stands away from what it sits on. I used these punches on earlier pieces too.

Inside the petals of a big flower, a straight gouge cannot get the mess out. Reach for a small spoon, a number 7 around 10 mm.

Why are the leaves plainer than the flowers?
The flowers carry this panel and the leaves only hold them up. Every concave I leave out of a leaf is attention handed back to the cluster at the centre.

I could give those leaves as many folds and curls as the blooms have. That would only pull attention off the main cluster. The leaves are there as framing, and I would rather the eye landed on the flowers and stayed there.
So one leaf gets a slightly raised vein, another just a concave between its separations, and two or three long grooves run with the twist. One curl at the tip where it wants one. I keep the concaves and convexes few. From across a room they read as leaves holding a bouquet, which is the whole job I gave them. Leaves that ARE the subject are a different discipline, and the Greek acanthus is where that starts. More flowers, if flowers are your weakness, are in the Hashemi set.
Where do the border divisions go?
Halve the distance, then halve what is left. Working out how many inches each division needs is slow arithmetic that lands you somewhere wrong at the far end of an oval, and dividers do the same job by eye.

Set the points on two marks, find the middle, mark it. Now halve each half again. Keep going until the spacing sits near what you wanted, then stop. The spacing came out at an inch and a quarter, and when I laid the original drawing beside it the two agreed, which does not always happen.

The first pass is a straight down cut with a mallet. I reached for a 7 mm number 11 to take off 5 mm of material. That sounds wasteful. Try the same job with a 5 mm tool and you can tear a corner, because its wings do not reach past the edge of what you are chopping.
Then the part that makes a border move instead of repeat. From the point of each chop, carry an arch down to the line, left side and right side both arriving at the same place. My chop stopped about two thirds of the way to the ground. The rest waits for the undercut, and I did not want to damage my background. Every moulding profile ever drawn is open to you here, and the online archives are full of catalogues of them. A whole course on carved mouldings sits beside this one, and so does the antique style rosette.
What textures the background?
A punch, driven with a hammer or a mallet. On this rosette I picked up a hammer. A mallet does the same job, so use the one you have.

Mine came as a bought set with two rows of teeth, and two rows are not handy in tight spots. So I filed one row off. Now the single row angles up into an undercut and textures the wall inside the shadow, and that separates a flower from its background even better.
You do not have to buy one. File the head of a nail or a screw and you have a punch. Whatever you use, the punching is really noisy, and you do not need to sit through it on the video.
Does sandpaper belong on a carving?
On this one it did, and I kind of like the result. The panel finishes under paint, so I sanded the high spots, went nowhere near the hollows, then burnished the surface with a chip off the bench until it came up almost shiny.

The burnishing is something you can do too. It costs nothing, since you are already standing in a pile of chips.
Paint grade is what made me willing to experiment. The paint goes on as the finish to prove the point for those of you who like sanding. And if you want sandpaper on your own relief carving, I'm okay with that.
When is thin superglue worth using?
Only when paint or lacquer is going over the top. Thin cyanoacrylate soaks straight through a fragile edge and stiffens the fibres.
My four small flowers finish really fragile, at shoulder height, where somebody could hit them. So they got stabilised. Leave the same carving raw, with no finish, and I would not use the glue at all. Under paint there is absolutely no problem, and under shellac or lacquer you can probably use it too.

Is this a sensible piece to start on?
Not for a first attempt. Try a simpler flower rosette first, or the beginner path if you have never held a gouge.
As I said on camera, this is not a beginner's project, and most of you already know the basics of undercutting. Laying out an oval. Keeping a bouquet from turning into wallpaper. Judging shadow ahead of the chisel. Those are design problems rather than tool problems, and you will meet all three in this course.
The pattern comes as a download sized to my own table at 24 inches, so yours can match. Browse the rest of the courses if this one is not your piece, or come and stand at the bench with me.
Somewhere in your house there is a flat panel with nothing in the middle of it. What belongs there? Come and carve it with me. Shall we carve?
How it's done
- Strike the oval with string. Mark both centre lines using calipers and two dots. Set one nail just inside the rim and swing a strip of paper from it to place the other two. Loop the twine, pull that first nail, run a pencil round, and repeat until one attempt looks right. Mark the keeper in red, so you know which line is the one.
- Rout or carve the rim. A Roman ogee runs round the outside. I ran mine on a router, because I had to finish this project.
- Trace the bouquet on, drawn as ovals. Carbon paper does this. Every bloom goes on as an oval rather than a circle, because sloping it later will shorten the shape and turn it round to the eye.
- Chop the outline with a wide gouge. Twenty millimetre sweep, straight down, working across the fibres. Stay three to five millimetres outside your drawn line, since the ground still has to slope underneath.
- Sink the ground in steps. Clear the waste with the widest tool you own, then tidy with a seven or a five. Leave about twelve millimetres below the flower tops for a start. The full depth ends near an inch.
- Slope each bloom in every direction. Round the flowers over so no flat spot survives. Watch the oval you drew shorten into a circle as the surface falls away, then redraw whatever pencil the cutting removed.
- Cut the separations by the light. Settle where the lamp sits, then tuck one petal beneath its neighbour so the shadow lands where you want it. Leave an open notch between two petals and it will not look as nice.
- Hollow the middles, then punch. Sink a small dome inside each button flower and run inward grooves with a gouge about a millimetre wide. Punch the centres and the ground last, which lifts the ornament off its background.
Frequently asked questions
Do I need a router for the moulded rim?
Nothing forces you to use one. The profile is a plain Roman ogee, so carving it by hand is perfectly possible. My room was against a deadline, so the router won that argument. Pick whichever suits the time you have.
Why does the string and nails method beat a compass?
A compass draws circles, and this shape is not one. Two fixed points and a loop of twine give you a genuine ellipse at any size, which matters when the oval is bigger than any tool you own. The Egyptians used the same trick.
How deep does the carving actually go?
About an inch at the deepest, and I checked it with calipers. Around the flowers I went down in steps. What I was after was shadow, and every concave and undercut gives you more of it.
What to carve next