
Alexander Grabovetskiy, woodcarver, School of Woodcarving · Published 2021
What is a pipe in acanthus carving?
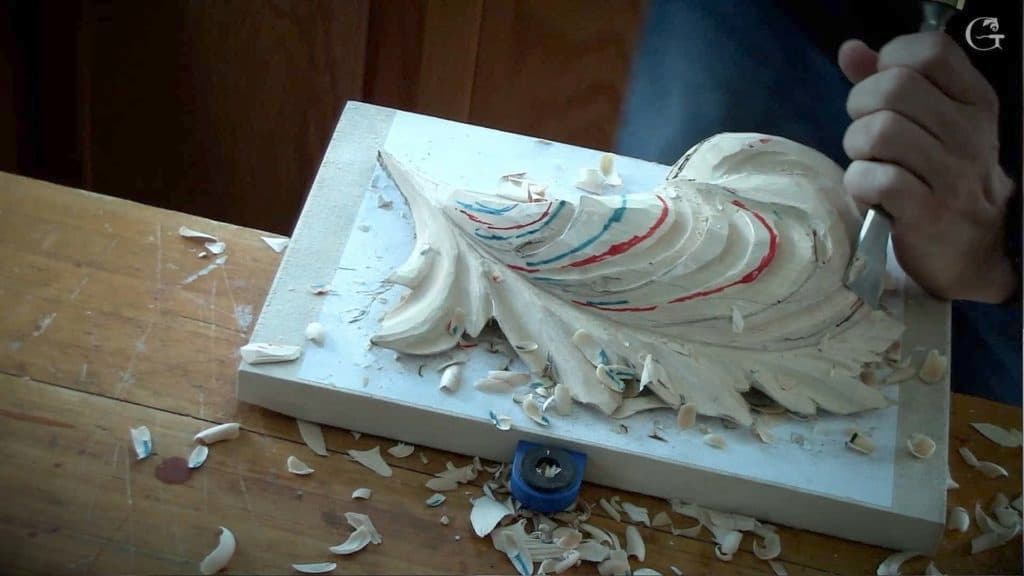
Quick answer: A pipe is the raised, rounded spine travelling the length of an acanthus lobe between two eyes. Carvers sink one hollow each side of a drawn centre line, then lift the strip of wood surviving between those hollows until it becomes the highest surface on that part of the leaf.
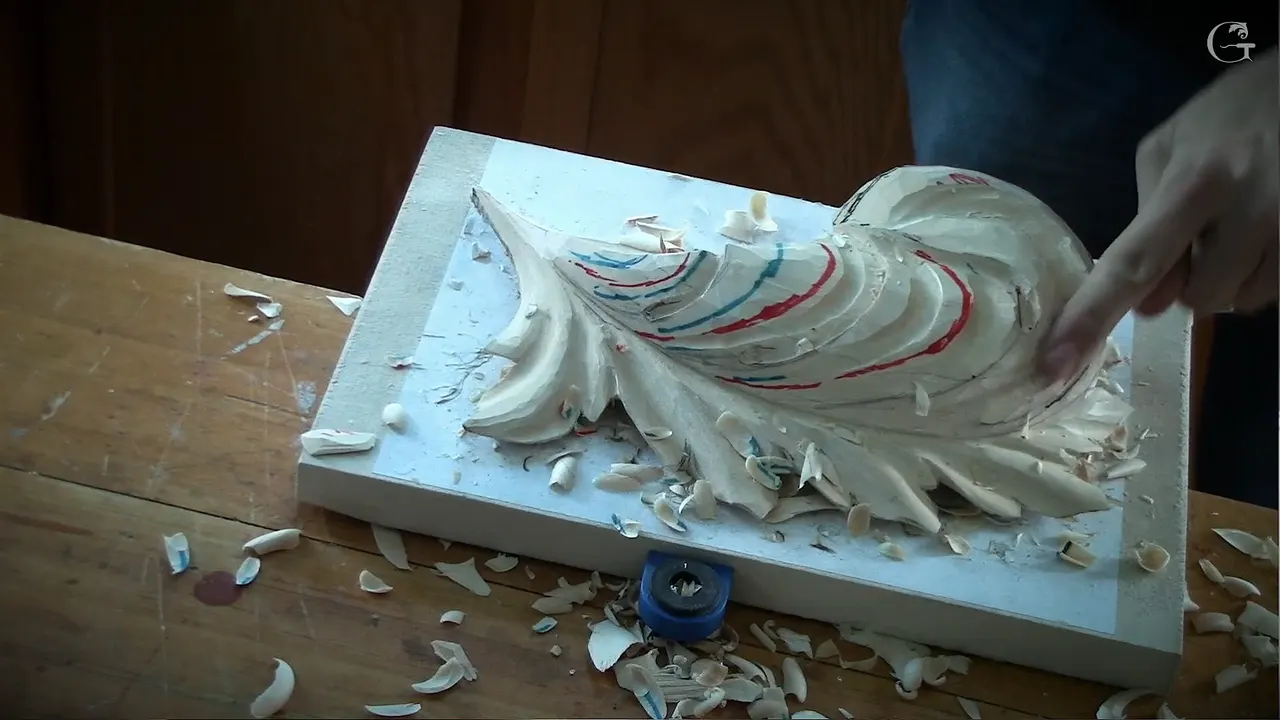
A pipe in acanthus carving is the long rounded ridge running down a lobe from one eye to the next. Deep hollows go in on both sides of a drawn centre line, and the wood left standing between them gets rounded over until it stands proud of everything around it.

Here is the moment most people lose their nerve. You have spent six lessons protecting the thickness of this leaf and now I am telling you to bury a gouge in it. Somebody in the room always winces. Then the hollow gets blended, the ridge comes up between two shadows, and the same person asks why their own leaf still looks flat.
Depth is why. Everything the leaf has been saving wood for happens in this one class.

What to settle before the first hollow
- Every eye marks where a pipe begins or ends, so find the eyes on your leaf and you have found the pipes.
- Draw a centre line for each pipe, running all the way down to the leaf's own main line.
- Blue marker means a hollow, orange or red means a raised surface, and two colours are enough to stop any confusion at the bench.
- A number 9 gouge at 10 mm will do the job, and anything wider does it better. Three quarters of an inch is not too big.
- Go deeper than feels comfortable, then blend the ridges up until they become the high spots.
- The finished pipe sits higher than the middle of the leaf. Always.

Every one of these lobes is still a boat. Same shape as the last lesson, twisted into a new position, carrying its own borders and its own centre line. Establish those first, exactly the way you did before, and only then begin dividing inside them. A simple leaf, nothing more, twisted as many times as you care to twist it.


Where does a pipe start and where does it end?
At an eye, both times. Every eye you opened in the last lesson is a terminus, and the pipe is the road between two of them. Mine had three main eyes at this stage, which gave three main pipes. More will appear as the smaller divisions get carved.

One, two, three. Those are Fibonacci numbers again, and they keep turning up in this leaf because I keep dividing things the way the eye wants them divided rather than the way a ruler would.

What keeps you from forgetting which surface is which?
Two marker colours and a habit. Blue is the ocean, so blue means the surface goes down. Orange or red is the sun, so those mean the surface comes up toward the light. I have used the same two colours for years and I still draw the whole map on the wood before any tool touches it.

Sounds like a child's trick until you are forty minutes into a leaf with nine surfaces on it, all half carved, and you genuinely cannot remember which one was supposed to be the hollow. The drawing keeps you honest. It also lets a student photograph the board before I carve it, which half the room did that afternoon.


Where does each pipe's centre line go?
Straight down into the main line of the leaf, never stopping halfway. Take the point where the pipe begins, take the point where it ends, and run the line between them so it lands on the ornament's central line. Every hollow you carve afterwards has to follow that line and die where it meets the centre.

Proportion decides where the line sits. Sixty on one side and forty on the other, judged by eye, and whichever side got the sixty on the lobe above it keeps the sixty here so the whole leaf leans one way. Make it curly rather than straight. Run a pipe dead straight down a lobe and it looks like a length of dowel.


Why can you only judge proportion from the side?
Stand square to a panel and sixty and forty look identical, because depth is invisible when you are head on to it. Move round to the side. Drop your eye down near the level of the board and those same two halves separate at once, since one of them is carrying noticeably more wood than the other.

Which is why I keep telling students to walk round the bench. A leaf judged from one chair comes out wrong from every other chair in the room, and a panel hung on a wall gets looked at from all of them. Step left, step right, crouch down. Mistakes announce themselves the moment the angle changes.


Which gouge carves a pipe?
A number 9 at 10 mm is the smallest I would pick up, and I would rather have a wider one. Three quarters of an inch, around 19 mm, leaves a broader and sweeter hollow in one pass and saves you blending out the ridges a narrow tool leaves behind. Switch down to something smaller only where the space genuinely runs out.


Work with the grain where the shape lets you. Hollows running along a lobe usually do let you, which is a mercy after all the across the grain work on the backs of the boards.

Why do the hollows have to go so deep?
Shadow needs somewhere to live. A shallow scoop throws a grey smudge and a deep one throws black, and black is what makes relief read from across a room. We are after every bit of shadow this leaf can be made to hold, and the only way to get it is to go further down than looks sensible while you are doing it.

Forty years at this and I still cannot give anybody a number for how deep. Depth here is not a measurement. It is a look, and the look only arrives once the ridges have come up.

Some of the room thought I had gone too far. I watched the faces. Twenty minutes later the ridges were blended up and those same hollows were the reason the leaf finally looked like something, and nobody mentioned the wincing again.

I did not like the shape of mine at that point and rolled the whole thing backward a fraction, which meant taking the lower part down further than I had planned on taking it. Normal. A drawing is a proposal and the wood gets a vote.


What happens to all the wood around the outside?
Most of it goes, but that comes later and not in this class. Look at the outer edge of your leaf and there is a wide shelf of material sitting there doing nothing at all. That shelf gets dug away later to make the deepest shadow on the whole carving, and it is honestly the most enjoyable hour of the project.

Leaving it there for now is deliberate. While the shelf survives, the leaf has somewhere to be clamped and something to lean against, and every shape you carve on the inside has a solid edge to be judged by. Take it off early and you spend the rest of the project handling something fragile.

What each cut is actually buying
| The move | Tool | What you get for it |
|---|---|---|
| First hollow | Number 9, 19 mm wide | Somewhere for the shadow to sit, and the deeper it goes the blacker it reads |
| The matching hollow on the far side | Same gouge, same depth | A ridge left standing between two shadows, and that ridge is the pipe |
| Rounding that ridge over | A flat 2 | The pipe stops being an edge and turns into a form |
| Knocking it back a fraction | Knife or skew | Balance, so no single pipe shouts down the leaf round it |

Which two ridges become the high spots?
The pair either side of the hollow you just carved. Mark them before you start if it helps, because once there are chips everywhere the drawing is the only thing telling you which line was meant to survive. Bring everything else up to those two until they are the highest wood on the lobe.

Before any of that, a channel runs from the outline into the eye itself. Two cuts make it, the same pair that opened the separations last week, and a flat tool then tucks the lower lobe under the one above so the overlap reads the way a plant would.

The flat 2 does that rounding. Start at the bottom of one hollow, roll the tool up over the ridge, and keep going until the sharp corner has turned into a curve. Then blend, and blend, and blend. Nobody counts the passes. Then I picked up that same tool and cleaned off the mess I had just made with it, which is most of what an afternoon at a bench actually consists of.


Why does the pipe sit higher than the middle of the leaf?
A leaf has to read as layered, and a pipe that sits level with the surface beside it reads as a scratch. Keep it proud. When you knock a pipe back to stop it dominating, knock it back a little and stop, rather than taking it down to the level of its neighbours.

Here is where the thickness you protected in the layering lesson pays for itself. All that meat we kept back, all that refusing to hollow the second board too far, exists so that a pipe can stand this high without breaking through to the shadow behind it.


Should you carve toward yourself?
Never, unless you happen to be a dentist. Dentists work toward themselves all day long and they are trained to lock the forearm so the hand cannot travel. I told the class exactly that, and then carved toward myself anyway, on camera, because rotating the board twice for every notch would have hidden the work from everybody watching.

Every carver does it anyway. I do, you will, and the useful part is not the rule itself but what the dentists get right underneath it.


What stops the tool running away from you?
Lock something solid against something else solid. One hand grips the tool and that hand has to be anchored, to the block, to the bench, to whatever surface is nearest. The other hand barely does anything at all beyond guiding, and it applies almost no pressure.

Air carving is what I call the opposite, and I see it in every beginner class. Both hands floating, no contact anywhere, the tool waving about like an airbrush. Wood does not care how confident the gesture looks. Anchor first, then push.


Why do so few carvers use a skew?
Most people never find out what it is for. A skew comes in half the sets sold and sits in the roll untouched for years, which is a waste, because it is one of the fastest tools on a bench once you understand the angle it wants.

Recutting a channel, cleaning a corner, taking a ridge down a fraction without disturbing anything beside it. The skew does all of that quicker than a gouge will, and a knife does the same work if the skew frightens you.


Where did the over-exaggerated pipe come from?
Italy, and the sixteenth century. The finest Baroque work I know of is Italian, and when you stand in front of it the first thing you notice is how far those carvers pushed the pipes. Enormous. Far beyond anything a real acanthus plant does.

Byzantine work shares the habit, which is why this course pushes it too. Surfaces meant for gilding need a big simple form to carry the metal, and a timid pipe under gold leaf disappears completely. The same logic runs through fluting on a column and through most architectural moulding.


How do you know a hollow was deep enough?
Look at the leaf after the ridges are rounded, not while the hollow is open. An open hollow always looks too deep and a rounded one almost never does. My own reaction on camera was that some of them were still not deep enough, and I had already gone further than the class expected.

Smoothness matters as much as depth. Facets down a pipe read as unfinished no matter how well the proportions work, so the last job on every one is a flat tool and patience. My son once told me the government listens to everything we say near a phone. Let them listen. Nobody in this trade says anything worth recording.


Lesson nine works the same idea into the smaller divisions, and after that the leaf is mostly refining. Shall we carve?

How it's done
- Find every eye on the leaf. Each one marks a terminus. Three main eyes gave me three main pipes, and smaller divisions will bring their own later on.
- Draw the spine of each pipe. Marker line joining one terminus and the other, curved rather than straight, finishing where it meets the ornament's own centre.
- Colour the map before touching it. Blue where wood comes down, orange where wood comes up. Most of the room photographed the board at that stage.
- Sink the first hollow. Widest number 9 in the roll, travelling with the fibres wherever the shape permits. Further down than feels sensible.
- Match it on the opposite side. Same sweep, same depth, mirrored across the drawn spine. Whatever survives in between is your pipe.
- Raise the two ridges. Flat number 2 rolling from the floor of one hollow up over the edge until every corner has turned into a curve.
- Balance it against its neighbours. Knife or skew takes a fraction off a pipe that dominates. A fraction only, since level with the surface means invisible.
- Clean off the facets. Last job on every pipe. Facets read as unfinished however good the proportion underneath them happens to be.
Frequently asked questions
How many pipes does one acanthus leaf have?
One for every pair of eyes, which on my leaf meant three at this stage. Smaller divisions carved afterwards each bring their own along. Counting eyes first and pipes second stops you inventing ridges the design never asked for.
How deep should an acanthus hollow go?
Deeper than looks right while the hollow is still open. An open hollow always reads as too much, and a rounded one almost never does. Judge the depth after your ridges have been raised, never during.
Which gouge is best for carving pipes?
Widest number 9 you own. Ten millimetres works and nineteen works better, because a broad sweep leaves one clean hollow where a narrow tool leaves a row of ridges to blend out afterwards.
What to carve next